Free NFTs With Arbitrum Odyssey
Despite already topping most charts, Arbitrum, Ethereum’s leading Layer-2 scaling solution, is launching a campaign to bring more usage and liquidity. Luckily for us, they want to hand out free NFTs for those participating in their Arbitrum Oddysey campaign, and the cost of doing so is minimal.
The choice of campaign name, taken from the Greek epic tale ‘The Odyssey’, implies that there will be a long heroic journey ahead full of challenge and reward. Indeed, the campaign will last for eight weeks and has 17 NFTs up for grabs per participant.
Arbitrum says the NFTs are by a ‘very famous designer’, which means they might have some value, and some will be reserved for those who complete all the available challenges during the eight weeks, meaning they will become rarer than others.
Rarity aside, the NFTs’ potential value, if any, remains unclear. However, Arbitrum are yet to launch their token, and the NFTs might become part of achieving a fair distribution in the event of an airdrop. While no airdrop has been announced, Arbitrums’s cheap transaction costs mean that taking part may be a smart decision. Moreover, there are some unexpected incentives too.
This week marks the first week of Odyssey campaign activities, which have a few rules and pitfalls to look out for.
Firstly, all you have to do to qualify is bridge any amount of $ETH to Arbitrum. You can bridge from any network, but be aware that funds bridged before this week will not count. You must make a new transaction before 13:00 EST on Tuesday 28th June.
Secondly, not every bridge in crypto is part of the promotion, so use this link to Arbitrum’s Discord which has a list of safe links you can use to bridges that qualify. You can also see the bridges in the picture below.
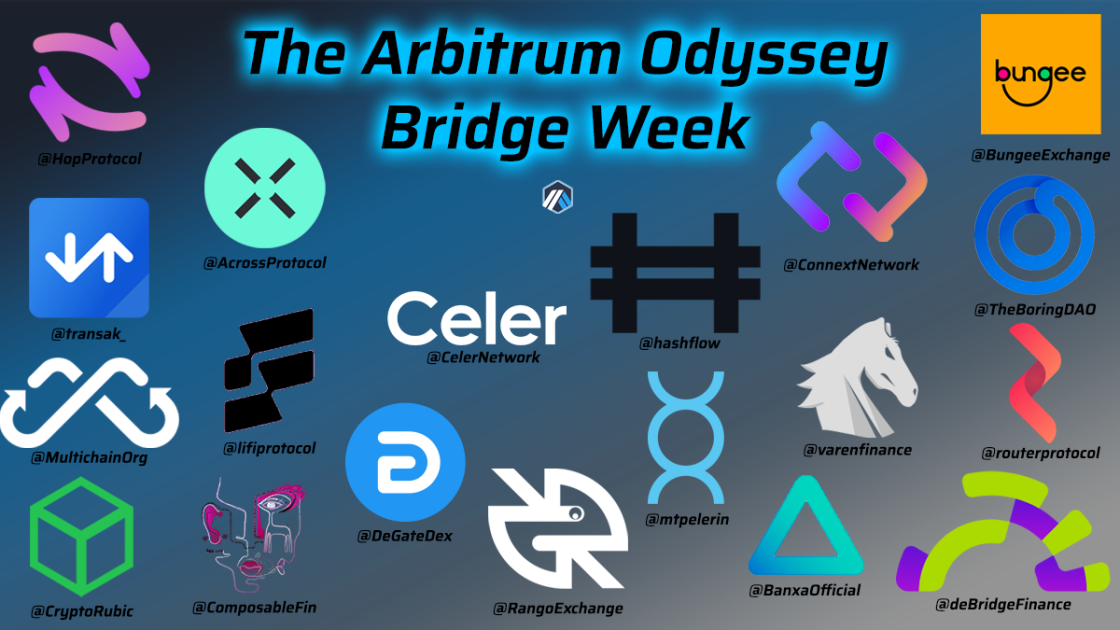
During testing, I found Bungee, Across, Celer, Hop, Li.Fi and Multichain had the best balance of price and speed, generally transferring in ten minutes or less at a reasonable cost.
The third point is that some bridges, such as Composable’s Mosaic, transfer $wETH rather than $ETH. Although they’re part of the competition, it’s unclear whether transferring $wETH instead of $ETH is acceptable.
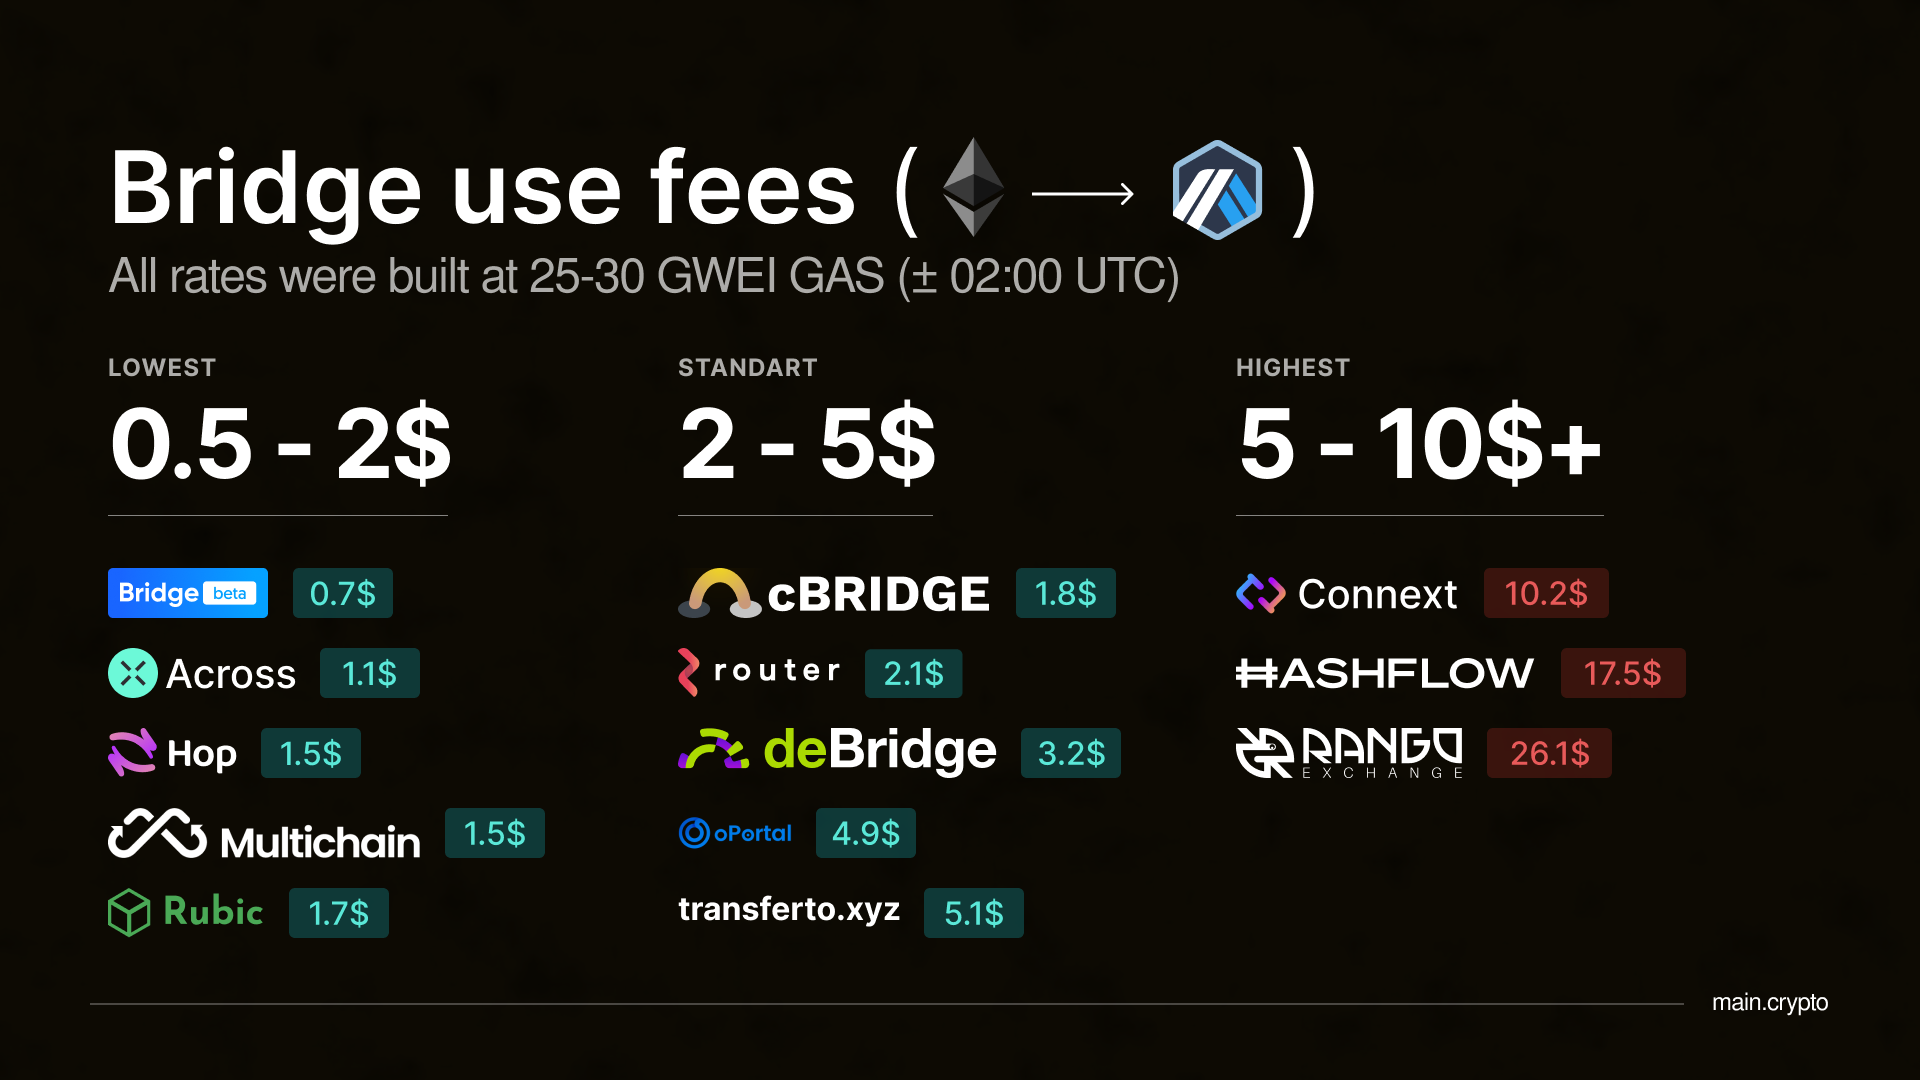
As you can see from the below screenshot from Arbitrum’s Discord, bridging costs can change quite dramatically, so keep an eye on the charges. Be aware that some bridges charge fees, whereas others may take a slice of your transferred funds instead.
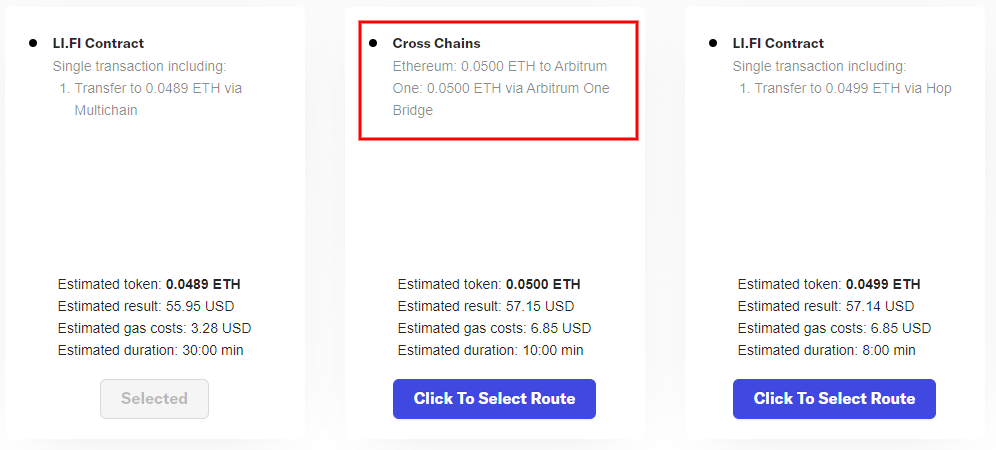
Finally, some qualifying bridges are aggregators that compare a range of bridges and recommend the best ones. When doing so, they may route your funds through Arbitrum’s bridge, which doesn’t qualify for the Odyssey campaign. You can see this in Li-Fi’s convenient info panels below to make sure your transaction is going through one of the eligible venues.
With those few rules and potential pitfalls covered, I’ll show you how to bridge funds from Ethereum to Arbitrum and some advanced techniques for controlling gas costs. I’ll use MetaMask as my wallet and Bungee for bridging as it presents choices of which bridge to use, and presents clear info.
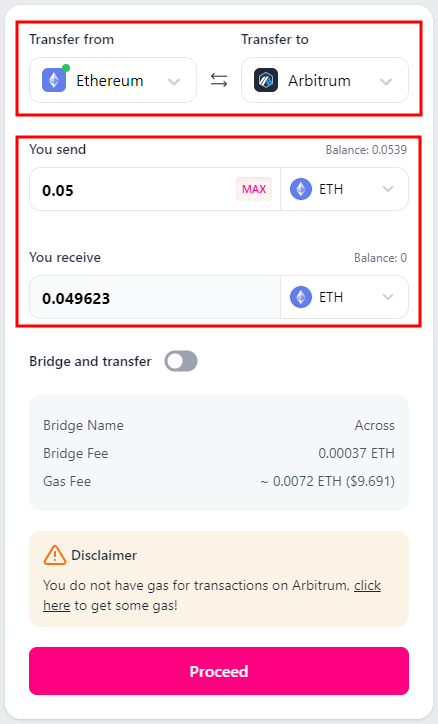
Head to Bungee to get started. In the below image, Bungee begins at the top by asking which chain funds will be transferred from and to. Make sure that you set Arbitum as your destination. Following that, you’ll need to set the token you want to transfer, ensure this is set to $ETH on the destination chain, then enter the amount.
You’ll see something like the choices in the image below. There are a few pieces of information to consider, such as how many user actions you’ll need to take in MetaMask, the gas fees, the time taken, and how much $ETH you’ll receive on Arbitrum. The best choice is not necessarily selected by default, so compare what’s on offer.
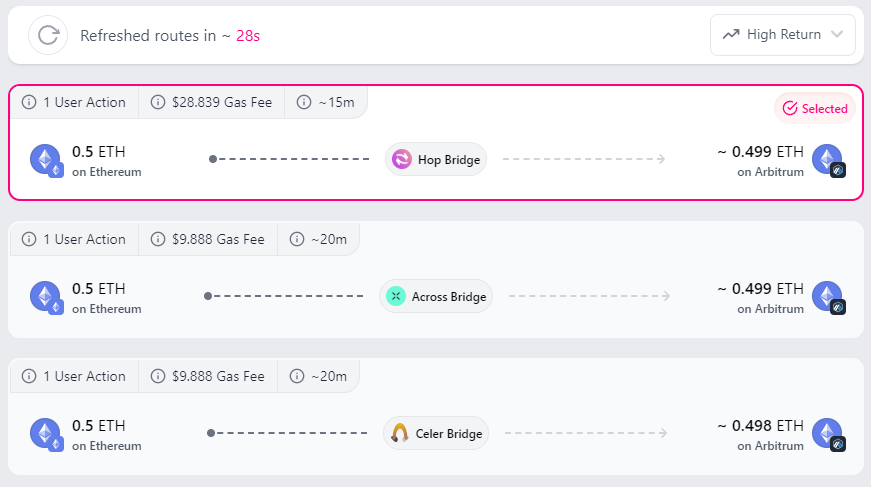
For my tastes, Across Bridge looks best; I’m happy to wait the estimated five minutes longer than Hop Bridge will take to pay just a third in gas fees while receiving the same amount of $ETH. Notice the ‘High Return’ box at the top right of the image. You can use this to foreground other options such as ‘low gas’ and ‘fastest’, depending on what’s important to you.
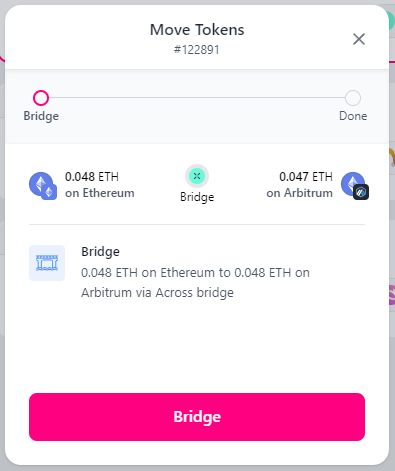
Now that I’m happy to move forward with the bridging, I can click on the pink ‘Proceed’ box, and the below new ‘Move Tokens’ window will appear, giving me a final chance to check the selected chains, tokens, and quantities, before clicking ‘Bridge’ at the bottom.
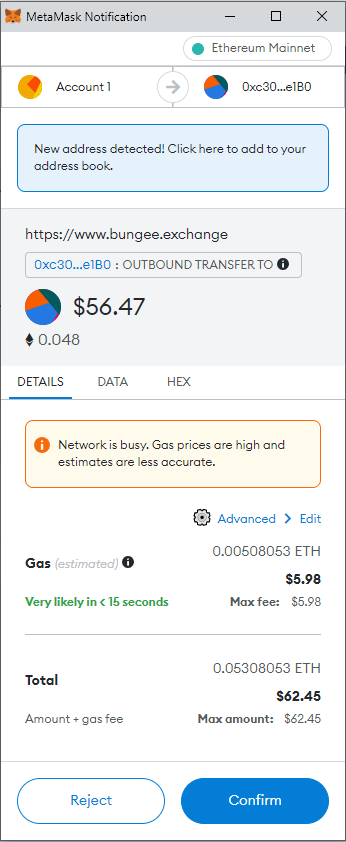
At this point, the below Metamask notification will appear, asking for the transaction to be confirmed. Before doing so, use MetaMask’s advanced options to edit the gas fee, preventing precious $ETH from going to waste.
Click on the Advanced > Edit blue text shown in the above image; it will reveal the below box.
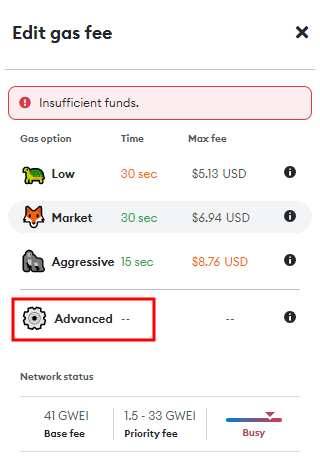
Here choose from a range of preset gas fees. MetaMask’s preset gas options account for how busy the network is, adjusting prices automatically. Use them to keep life simple. Usually, the highest fees are also the safest. Alternatively, click on the ‘Advanced’ option in the red box to set custom fees.
Save your settings once done. MetaMask will return to the confirmation window where the blue ‘confirm’ button can be clicked to start the transaction.
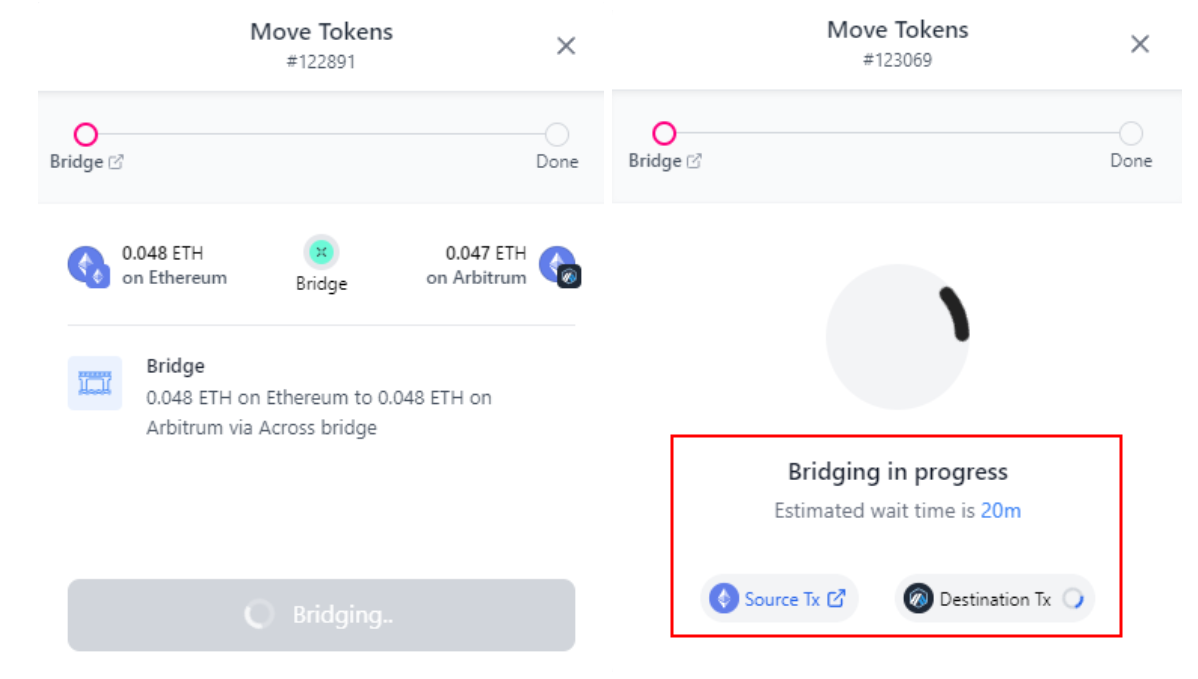
Once confirmed, you should see the two screens as shown below, one after the other. In the red box on the right-hand part of the image is the sign that your funds are successfully in the process of being bridged to Arbitrum.
Note the wait time of twenty minutes and the links to Etherscan and Arbiscan, allowing the transaction to be checked in detail if needed.
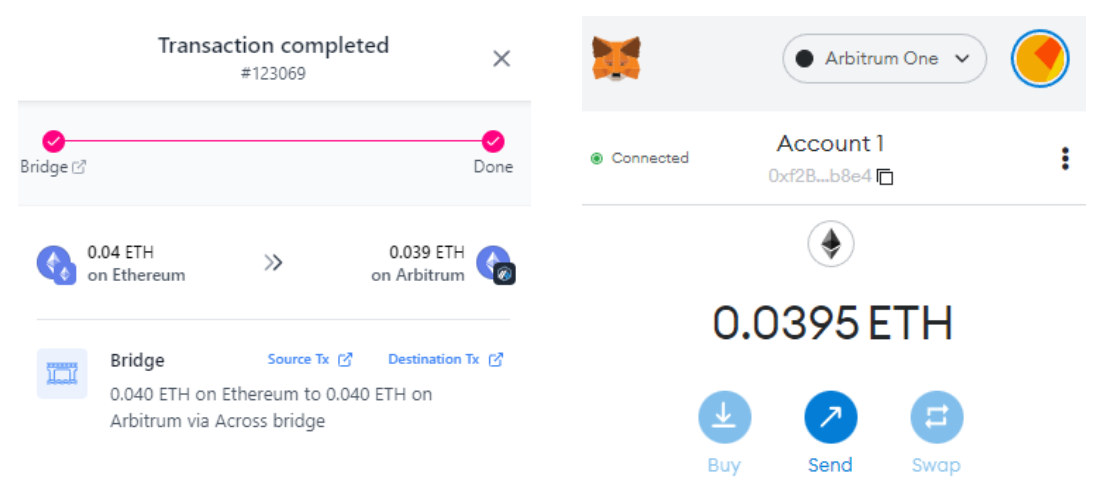
After some time, the transaction will complete, and the window will change again. Success will look like the below images, with Bungee on the left showing the ‘Transaction completed’ screen and MetaMask on the right showing $ETH on the Arbitrum network.
If the Arbitrum network hasn’t previously been added to a MetaMask wallet, it can be done simply by clicking on the ‘Destination Tx’ link at the bottom right of the above Bungee window. This will open Arbiscan.
On Arbiscan, at the very bottom of the page is a small ‘Add Arbitrum Network’ next to the familiar MetaMask fox logo. Clicking the button and following the instructions will add Arbitrum to MetaMask. No harm can be done.
![]()
Well done for making it this far. You should be able to bridge funds and have learned how to control the gas costs for transactions.
A bonus I discovered while writing this is that some bridges are beginning to announce extra incentives for using them as part of Arbitrum’s Oddyesy competition. In some cases, this is free money.
Keep an eye on Arbitrum’s social media accounts for announcements; at the time of writing, Router Protocol has announced their incentive, and others will likely follow.
And one more thing. Also keep track of which Arbitrum bridge is used by the most people during Bridging Week. Those that use the most-used bridge will receive an extra NFT. You can see which bridge is in the lead by checking this Dune Analytics dashboard.
Altogether I hope this email has brought you great value. We’ve covered opportunities to win NFTs, get incentives, use other networks, and some of MetaMask’s less obvious features. We spend our days at SIMETRI looking out for opportunities like these and developing techniques that make you better. If you’re not already a member, come and have a look at us here.
Until next time
Did you like the content of this Email? Follow us on Twitter.
Our research team at SIMETRI is also constantly sharing alpha. So feel free to follow me: Anthony, and my colleagues: Anton, Sergey, and Nivesh. Disclosure: At the time of writing, the author held a number of NFTs, ETH, and several other cryptocurrencies. Read our trading policy to see how SIMETRI protects its members against insider trading.
