Earn By Providing Liquidity to Uniswap.

Liquidity provision lets you earn passive income by putting your capital to work on DeFi applications. The most common example is providing liquidity to the Uniswap decentralized exchange for trading fees.
Liquidity provision lets you earn money on your idle capital. Say you have 10 ETH you plan to hold for another 3-5 years. Instead of letting it gather dust in a cold wallet, you could be earning interest on them instead.
To understand why blockchain protocols would pay you to use your cryptocurrency it’s necessary to understand how Uniswap is designed on a big-picture level.
Unlike centralized exchanges like Coinbase Pro or Binance, Uniswap doesn’t have an order book. This is because traders on the platform don’t trade with each other, they trade with smart-contracts.
A smart-contract on Uniswap represents a trading pair, the same way AMZN/USD represents the trading pair between Amazon stock and US dollars.
A quick heads up, the next paragraphs involve some math formulas but understanding them isn’t strictly necessary to earning returns on your crypto.
A decentralized exchange calculates asset prices based on the constant product formula x * y = k, where x and y are liquidity balances of each of the pair’s tokens and k is constant liquidity.
The larger x and y is, the better. Consider two liquidity pools:
- Pool A: x = 100 ETH, y = 55,000 USDC, k = 5.5 million
- Pool B: x = 100,000 ETH, y = 55 million USDC, k = 5.5 billion
From a trader’s perspective, the best trade is the one that is executed at the most desirable price. This is especially true for large trades, where a fraction of the percent can represent thousands of dollars.Let’s consider a user who wants to buy 10 ETH on Uniswap. Before the trade occurs, ETH prices on both pools are the same:
Pool A: 55,000 USDC / 100 ETH = $550 per ETH
Pool B: 55 million USD / 100,000 ETH = $550 per ETH
However, after the trade, the prices between the two pools will change. Since Pool A has significantly less cryptocurrency in it, its price will move far more than Pool B.
Sparing you the math, the price of ETH in Pool A will jump to 617.2 USDC, while in Pool B, it will change to 550.06 USDC. As you can see, Pool A is impractical to use for large trades because prices would move too much.
To maintain a comfortable experience for traders, Uniswap needs as much liquidity on its pairs as possible. That’s where you can step in and help the platform while helping yourself.
Adding Liquidity to Uniswap
In the following example, we will review the ETH / WBTC pair because it’s one of the most liquid on Uniswap and the risk of catastrophic losses is much lower. More on that later.
It’s important to note that to provide liquidity to a pair, you will need to have both ETH and WBTC. You will need to add both of the assets to keep the pair’s trading pair ratio constant.
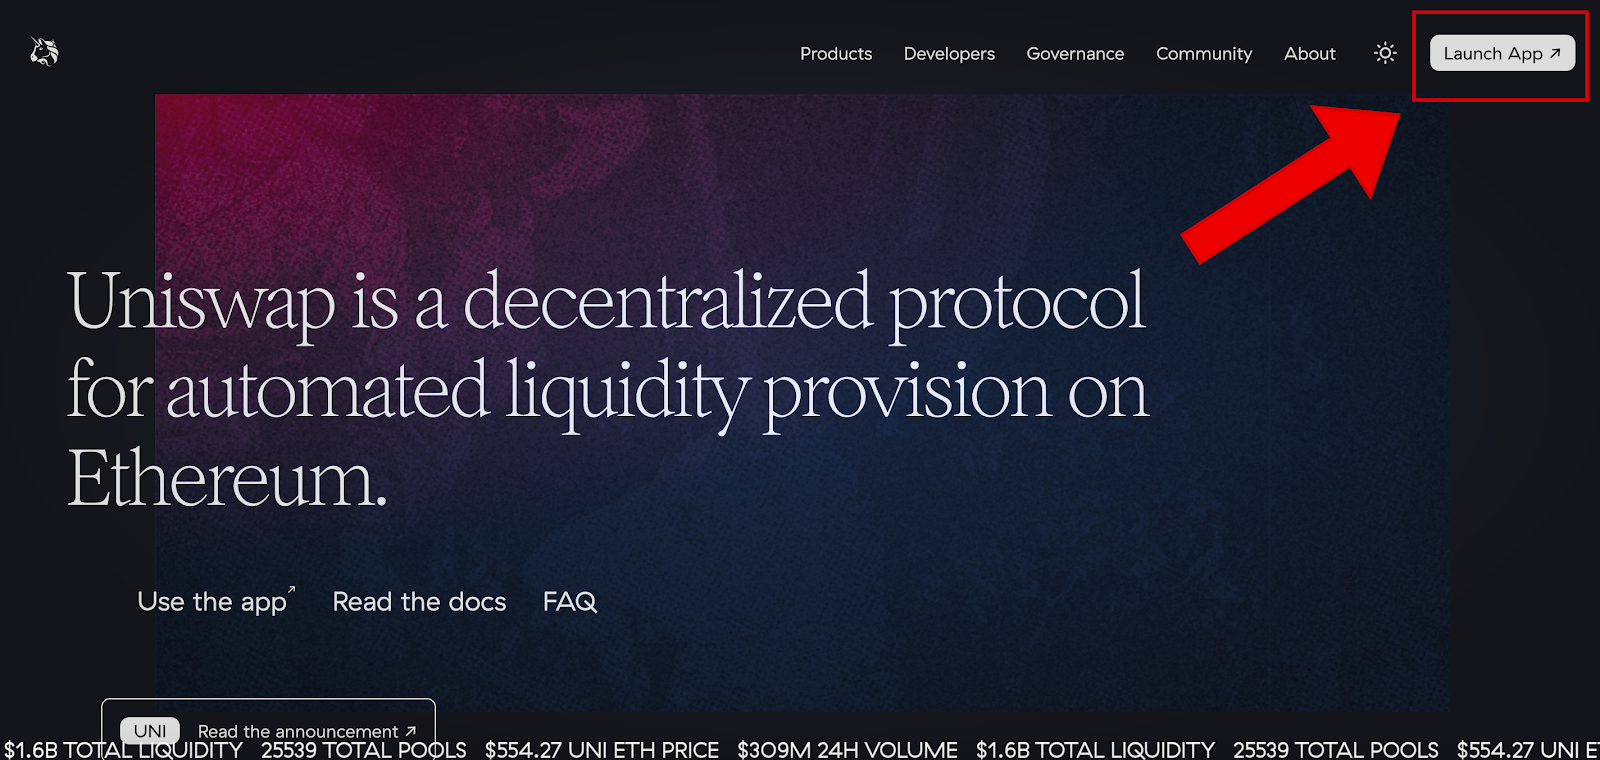
Go to https://uniswap.org/ and click on ‘Launch App’ in the top right corner.
If you haven’t installed Metamask, then stop what you’re doing and get yourself up to speed right now. Follow the instructions in the video below.
Youtube: How To Use MetaMask: Ethereum Wallet in your Browser
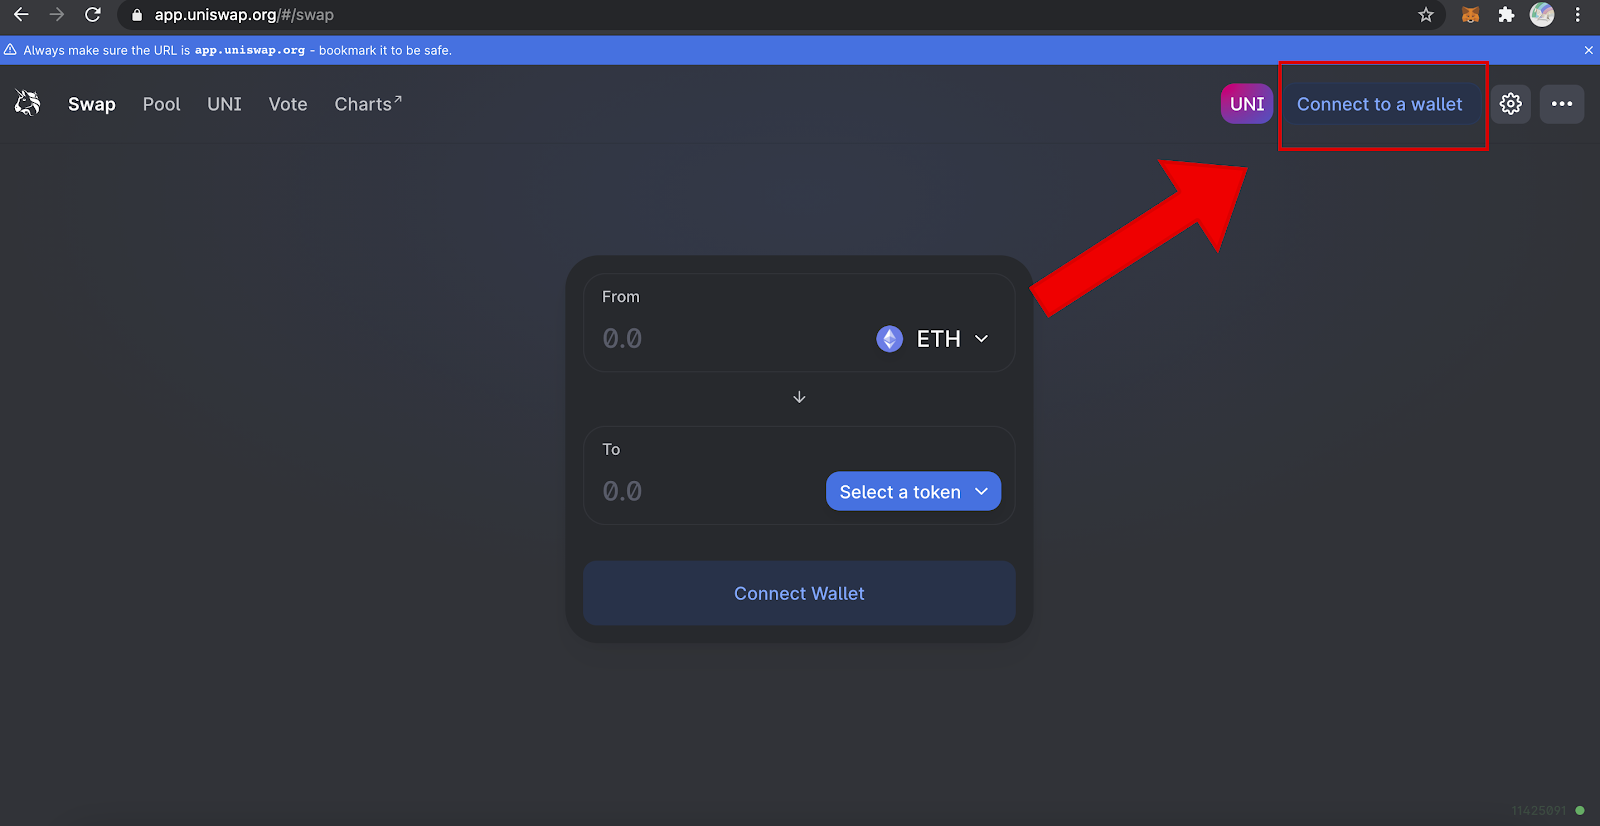
Connect your Metamask to Uniswap by clicking on ‘Connect Wallet’ in the top right. Choose ‘Metamask’ in the pop-up window.
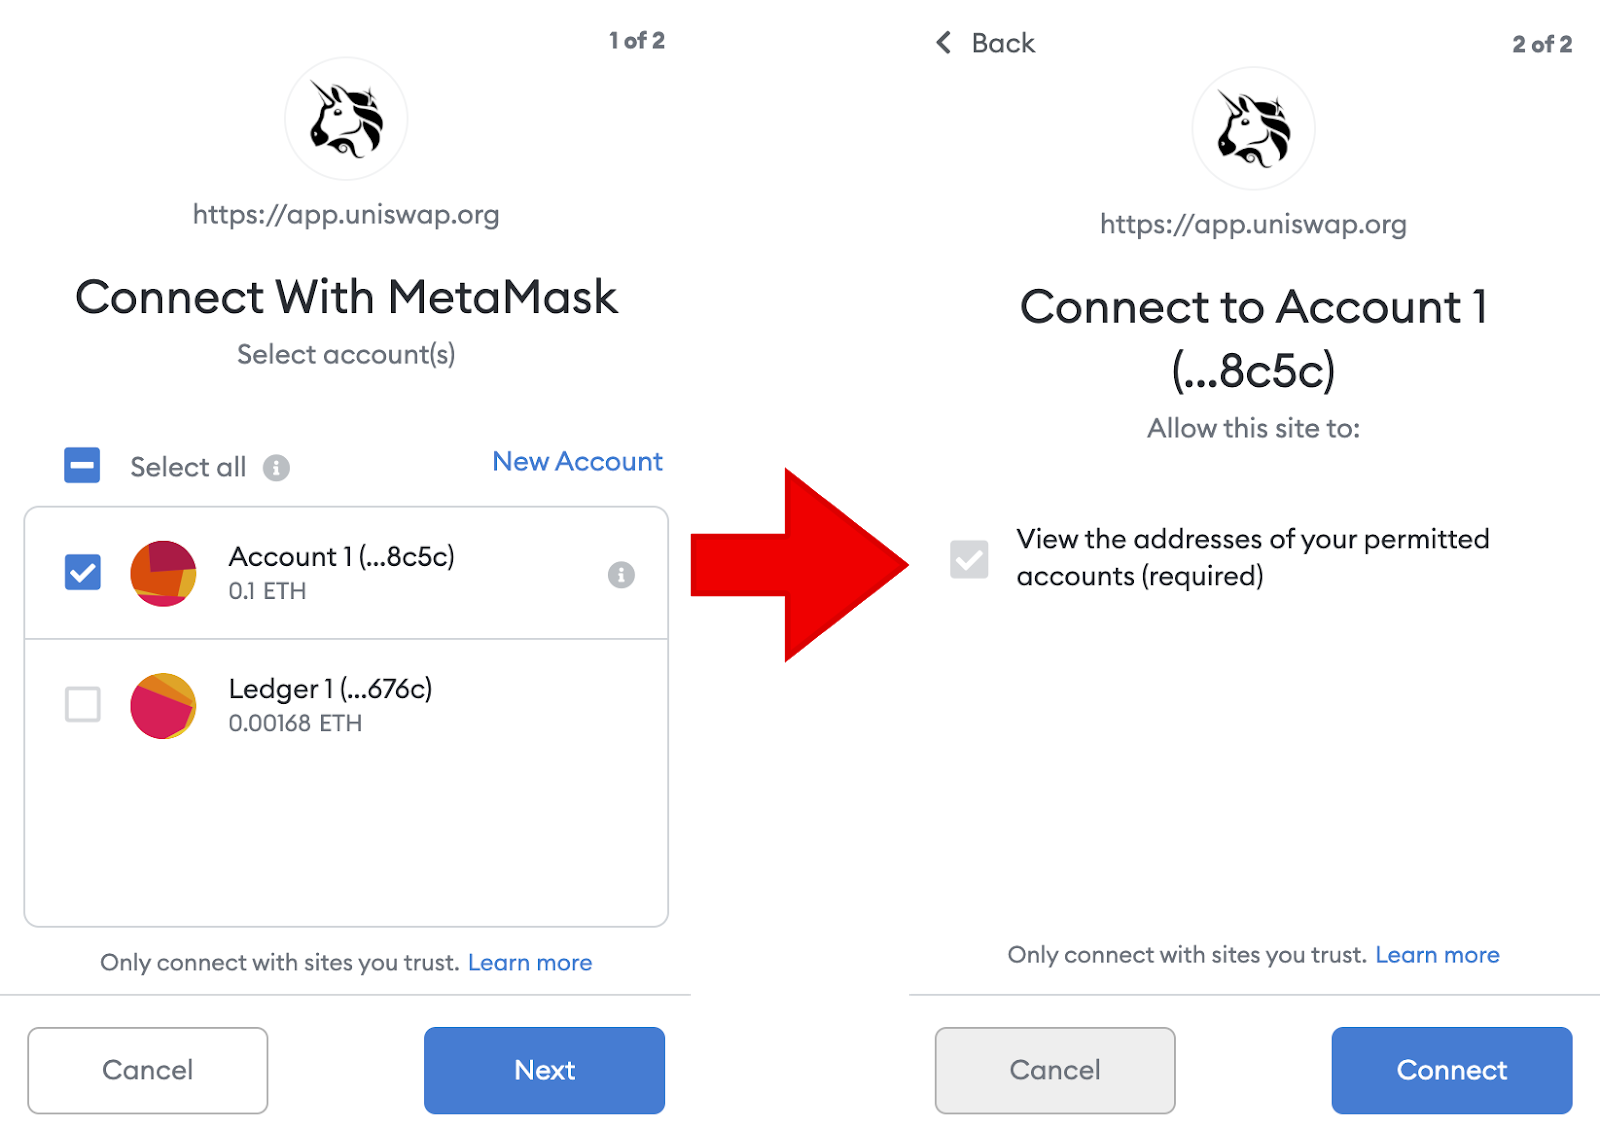
Metamask will ask you to select the account you want to connect and approve the connection. It’s a two-step process, click on ‘Next,’ then ‘Connect.’
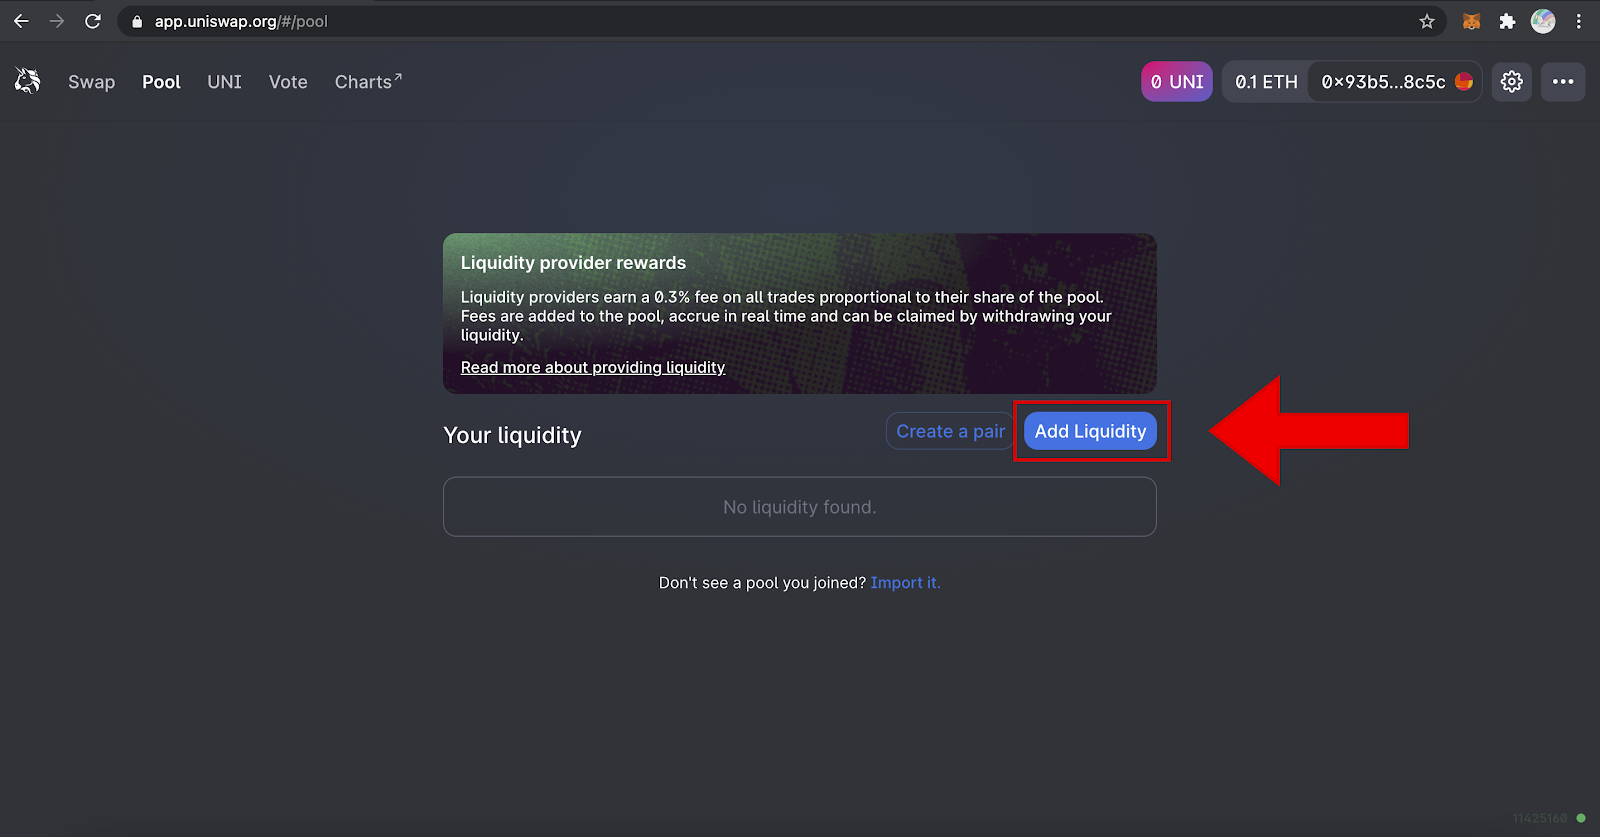
Once your Metamask is connected, go to the top left corner of the website and click on the ‘Pool’ tab.
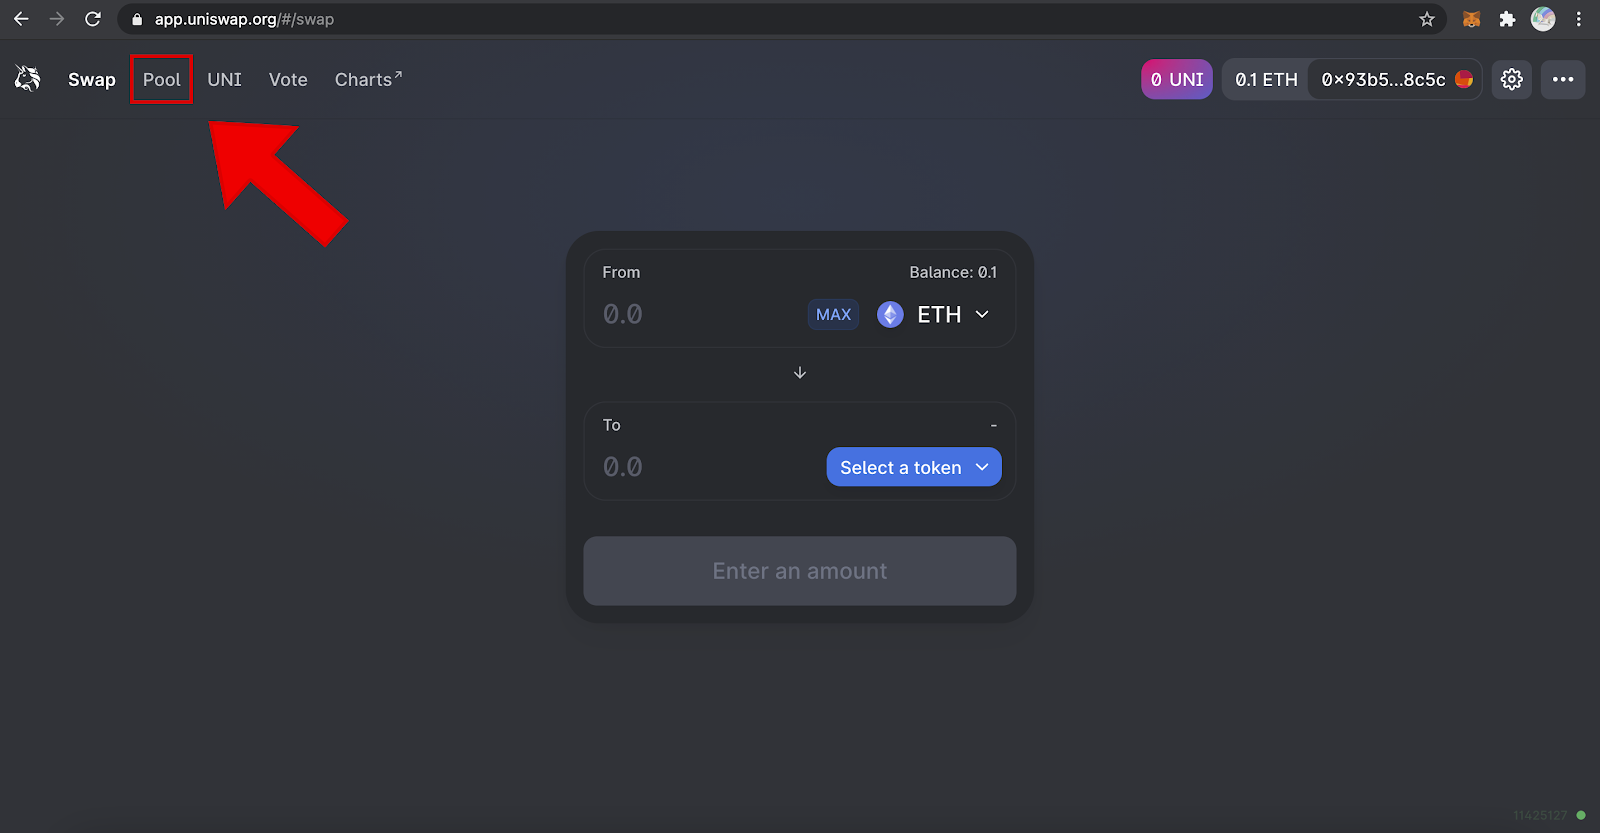
Here you will see the reason to provide liquidity in the first place. Uniswap charges a 0.3% fee on each trade, which goes to liquidity providers like you. More on that later. Click on ‘Add Liquidity.’
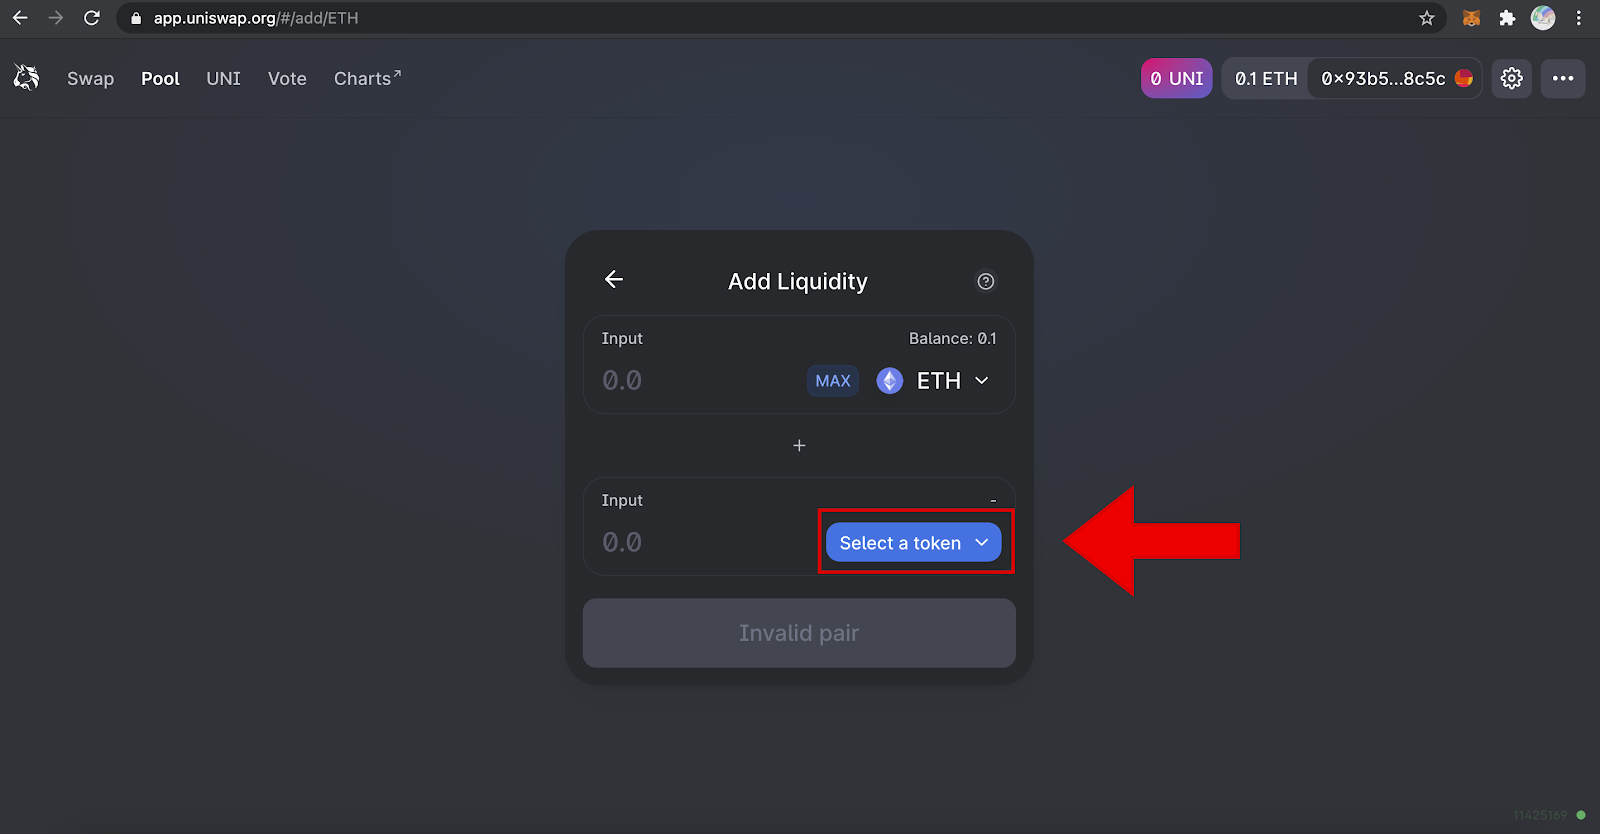
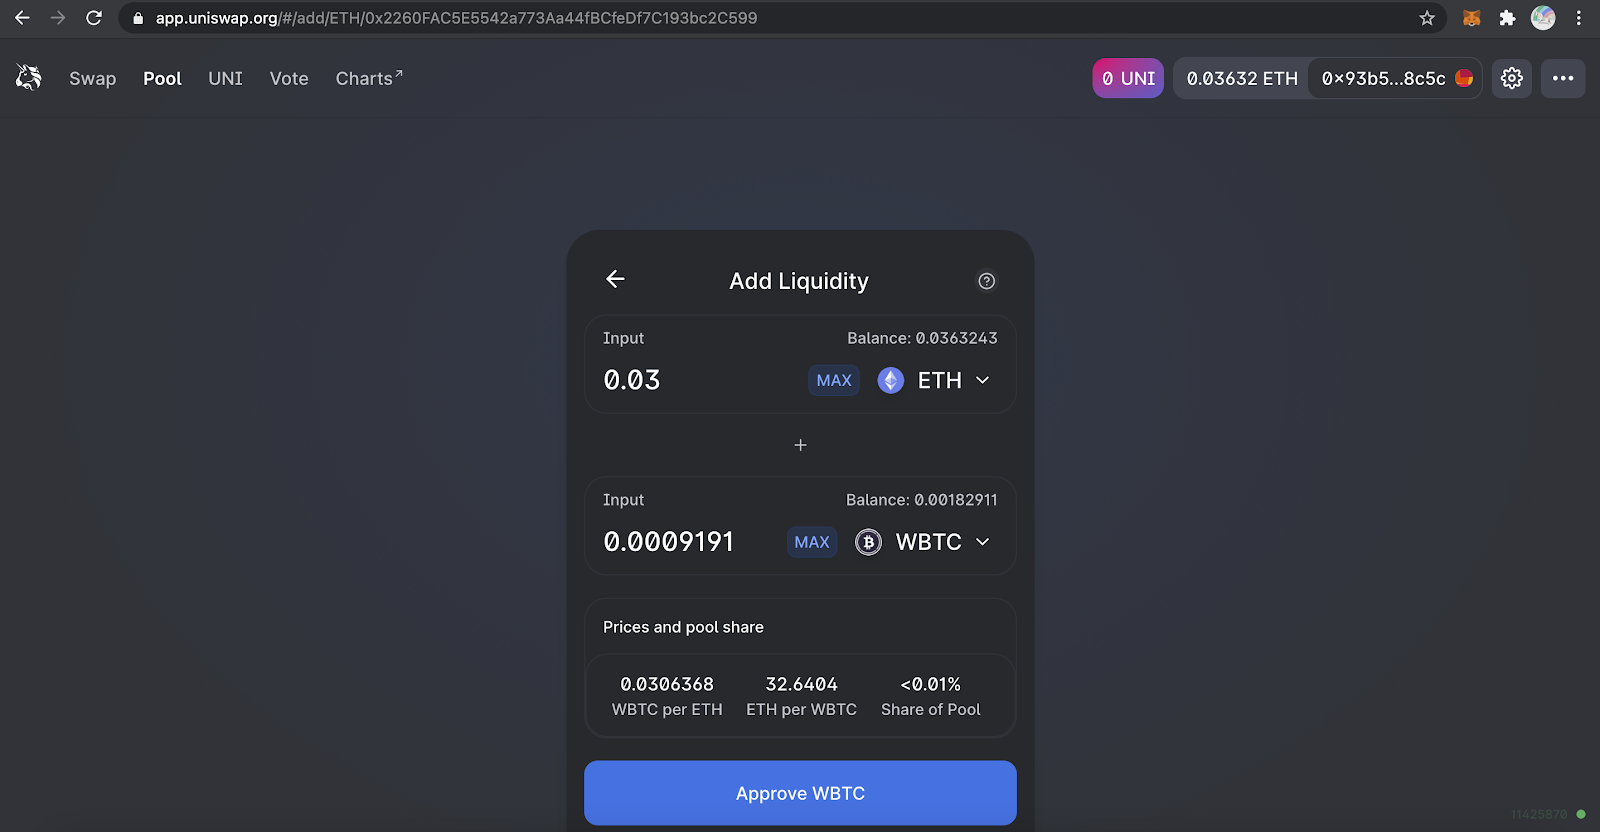
The page for adding liquidity resembles the page for swapping assets, but they function very differently. Our desired pair is ETH / WBTC, so you need to select WBTC. To do so, click on ‘Select a token.’
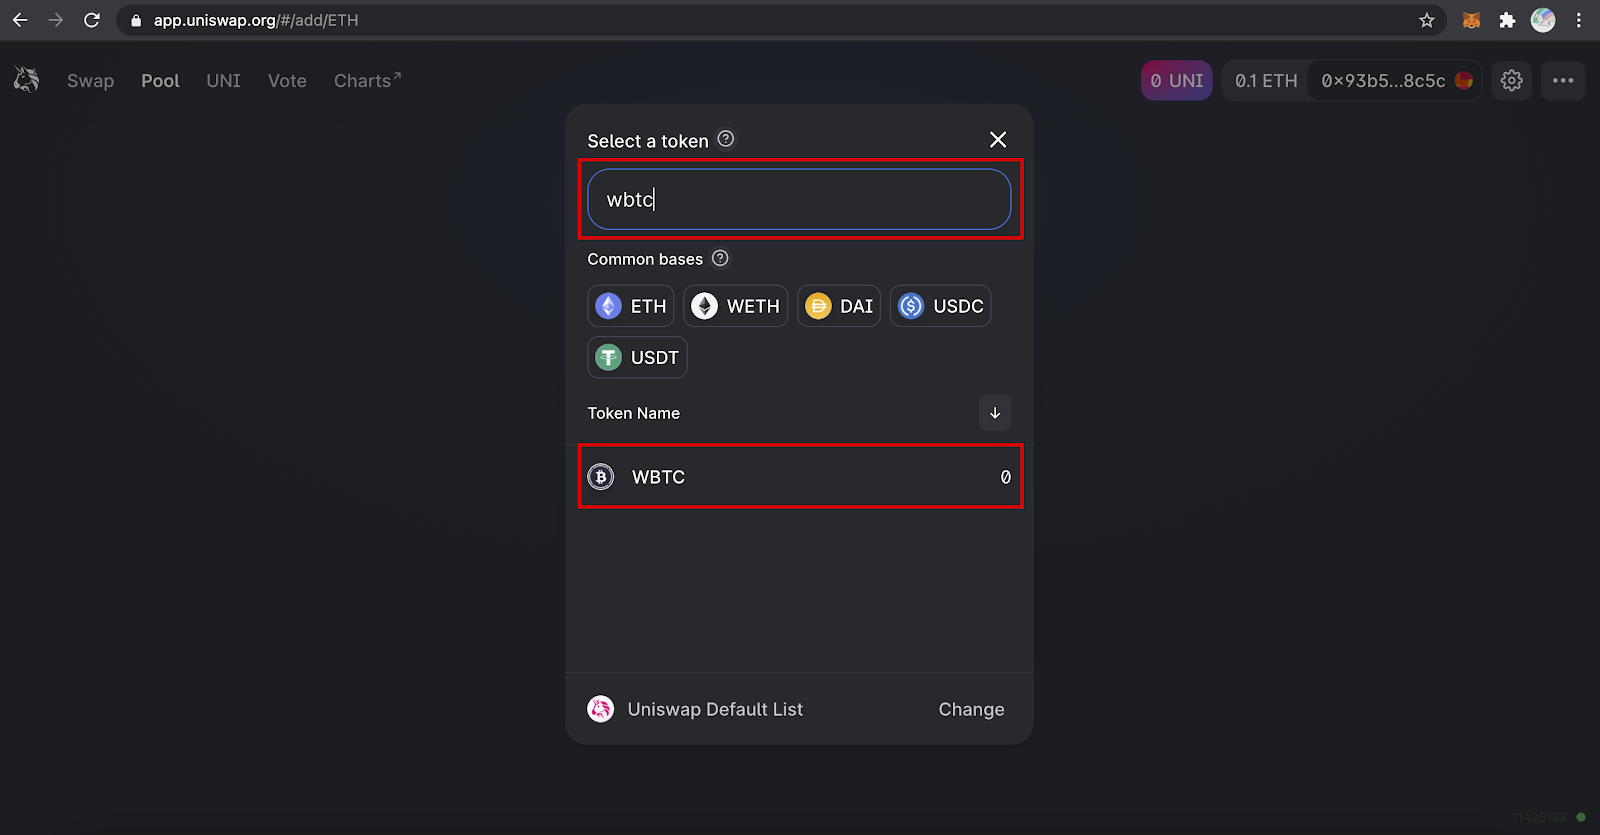
You will see a search bar and a list of tokens. Uniswap uses the Token Lists feature to protect from scams. Hence, you can type WBTC in the search bar instead of looking for the token’s Ethereum address. Select WBTC.
Once you have both of the assets selected, you will see their prices and your percentage of the pool share. The 0.3% fee accrued on the pair’s trades is distributed proportionally to the pool’s owners. The higher share of the pool you own, the larger chunk of that 0.3% fee you will get.
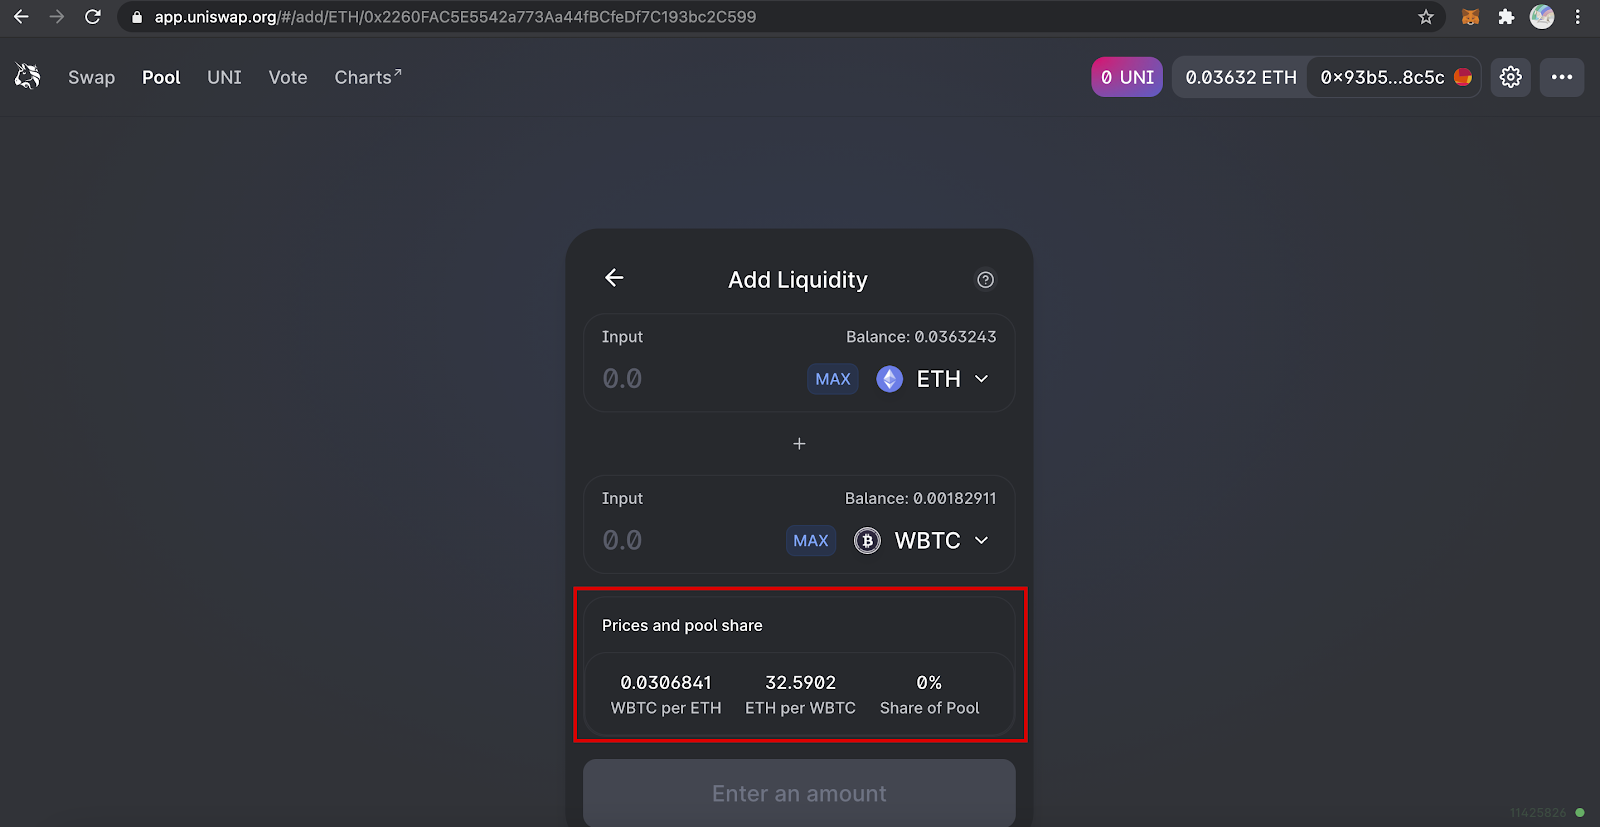
When you specify how much of any asset you want to provide to the pool, the other asset’s amount is set automatically. Remember to keep the pair’s pool constant, you need to add equal proportions of each of the assets based on the pair’s prices.
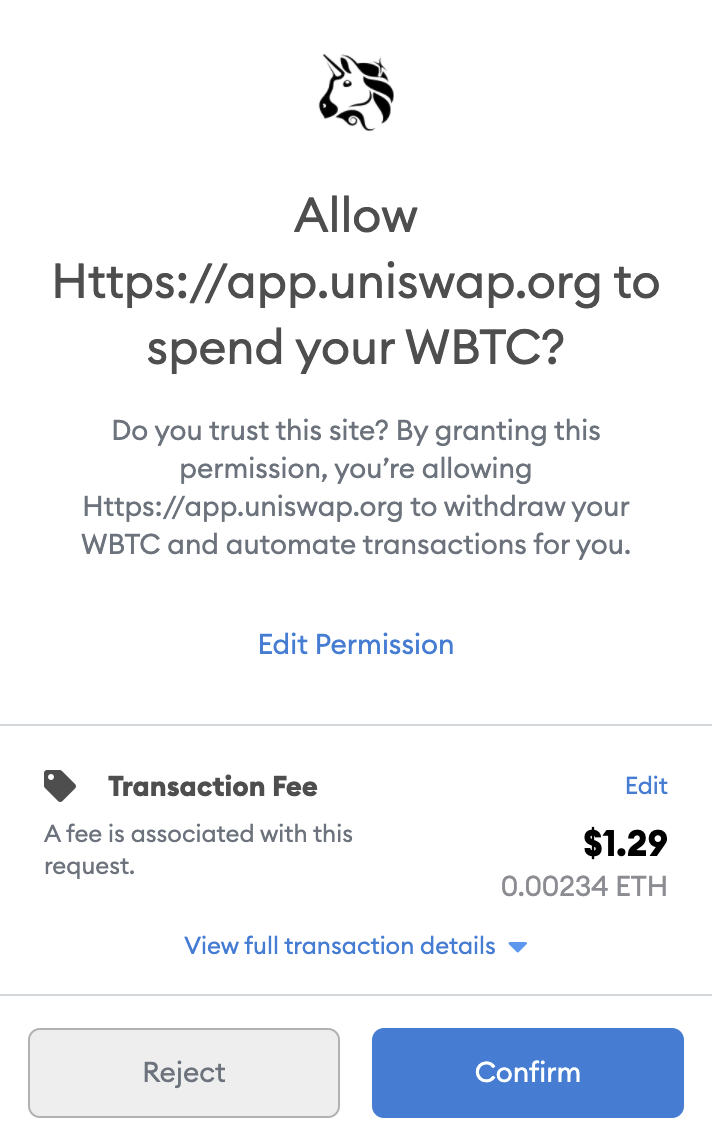
If you interact with Uniswap for the first time, you will need to approve WBTC first. The ‘approve()’ function is standard for ERC20 tokens. In this case, you enable Uniswap to withdraw WBTC from your address.
Upon approval, a Metamask window will pop up, stating that you have to pay a fee for the approval transaction. Do not change gas settings when interacting with smart-contracts or your transactions will fail.
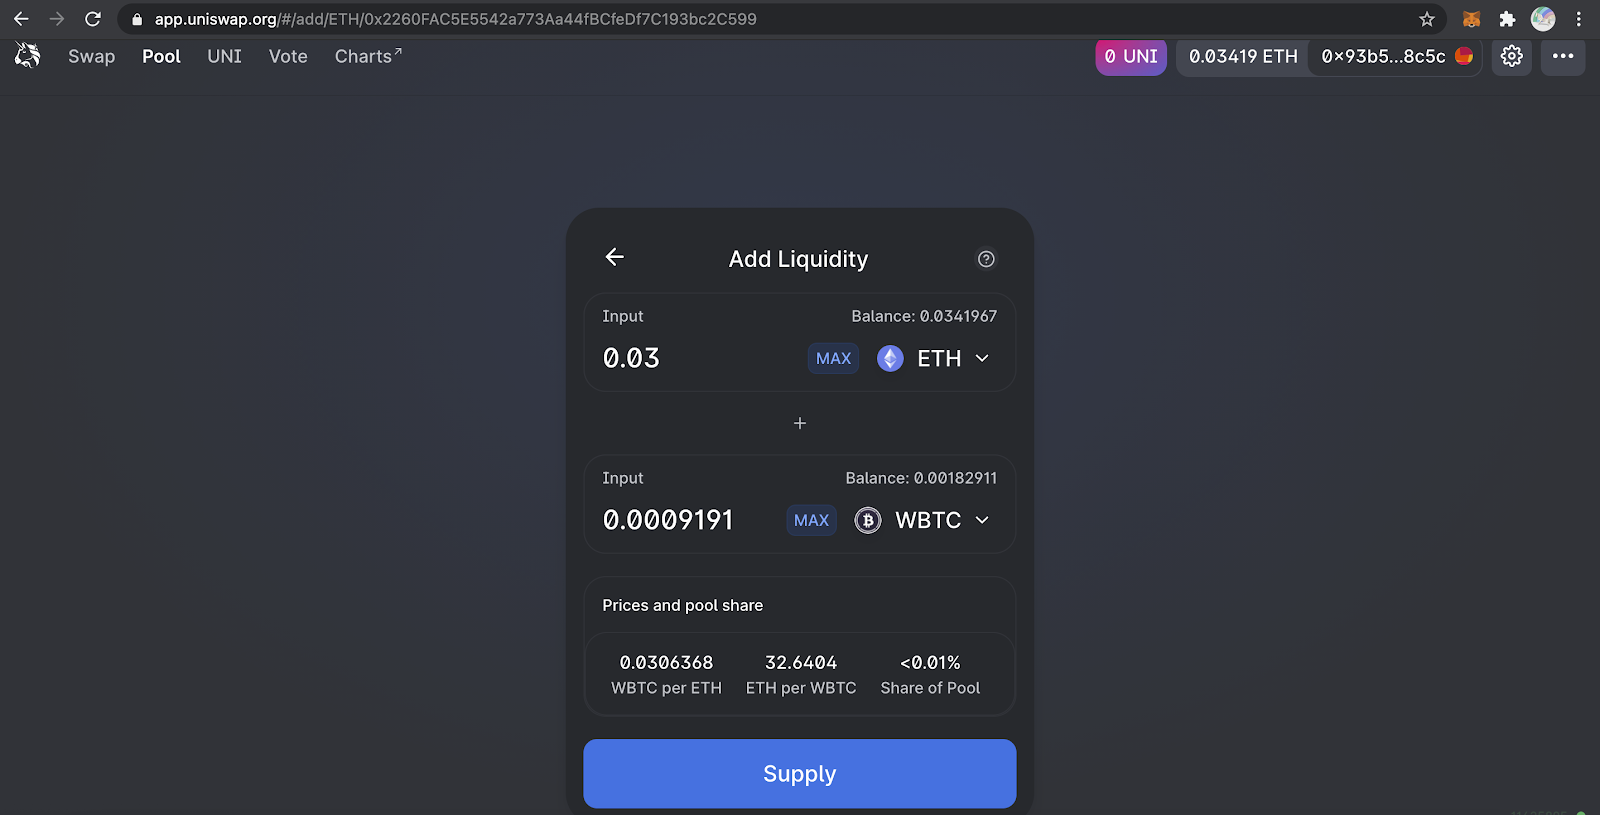
After approving WBTC, you can finally start providing liquidity. Check all of the details once again and click on ‘Supply.’
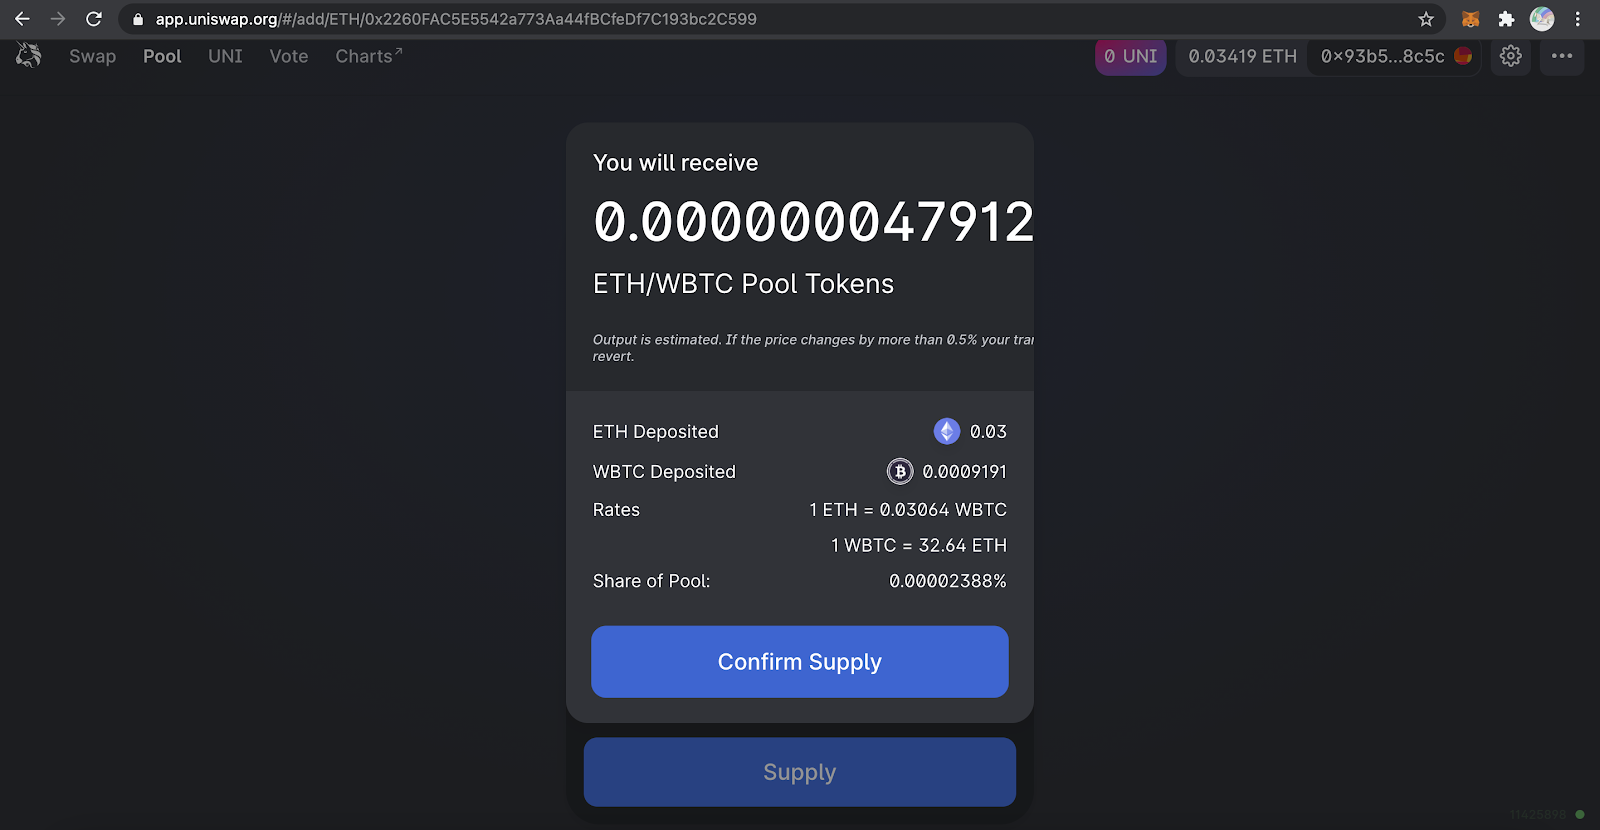
On the next screen, you will see your percentage share of the pool and the number of ownership tokens you will receive in return for your ETH and WBTC. Liquidity provider (LP) tokens represent your rights to that specific portion of assets plus fees in the pool.
After you confirm your liquidity provision and Ethereum confirms the transaction, you can review your liquidity tokens. They won’t be visible in your Metamask at first, but you can add them.
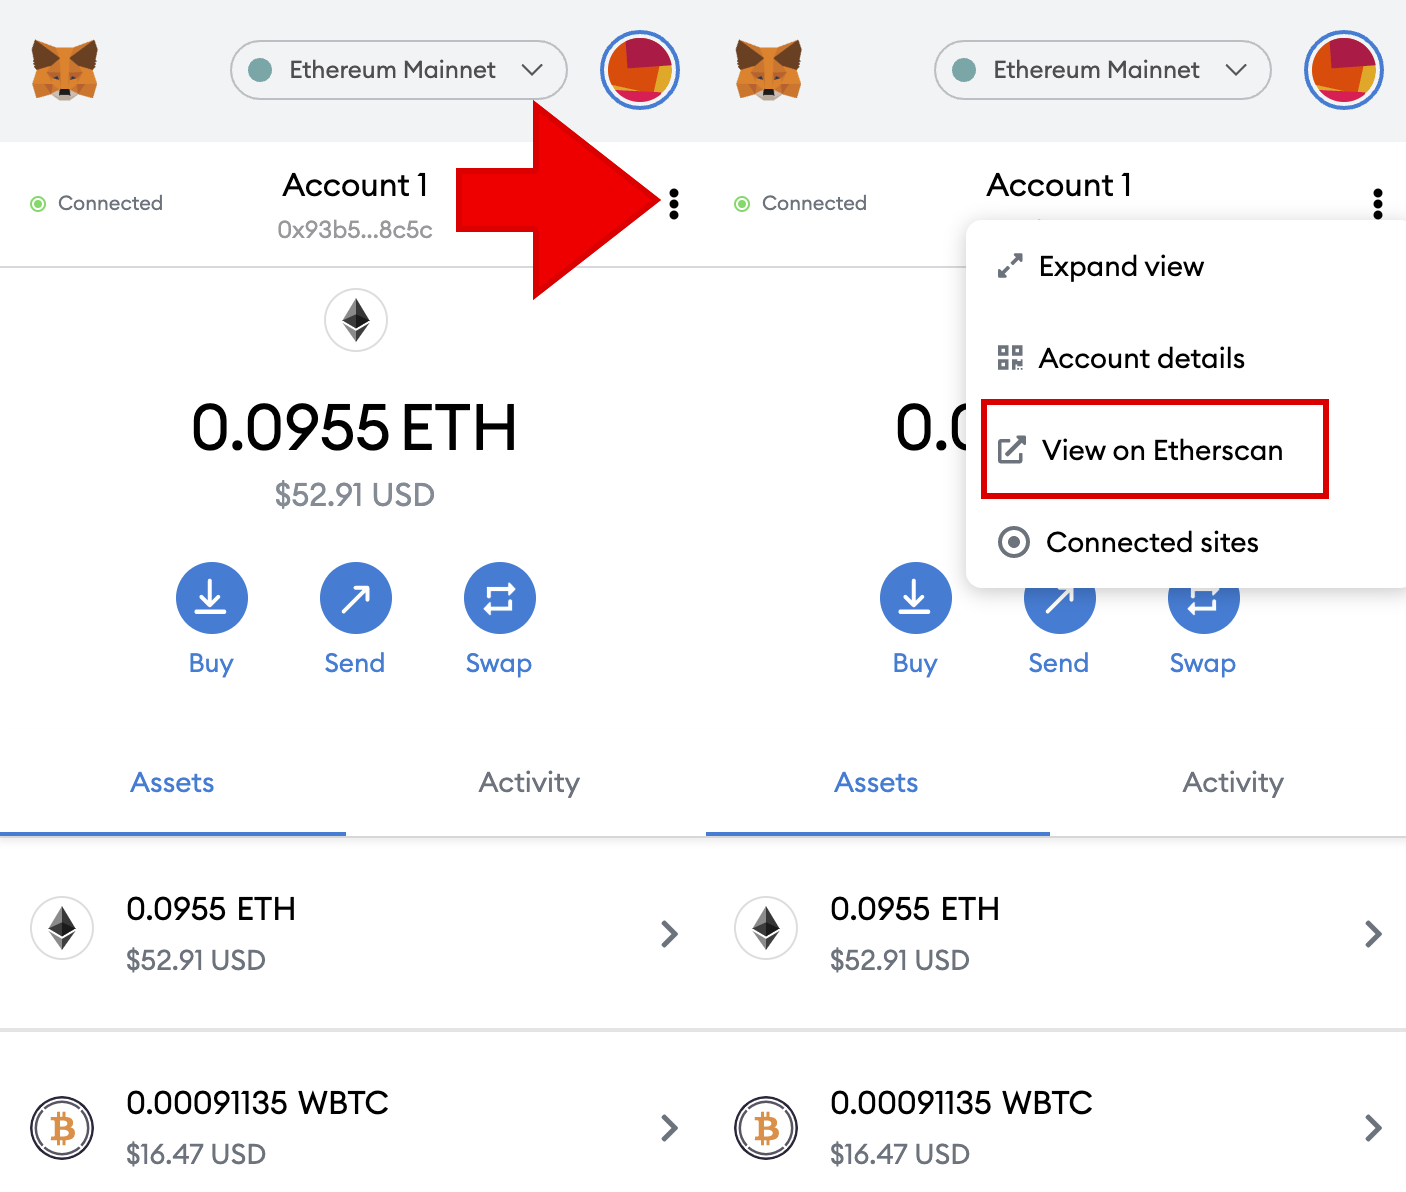
Click on your Metamask extension at the top right corner of the browser, and then click on three vertical dots to the right of your account address. In the dropdown menu, click on ‘View on Etherscan.’ A new tab with Etherscan will appear.
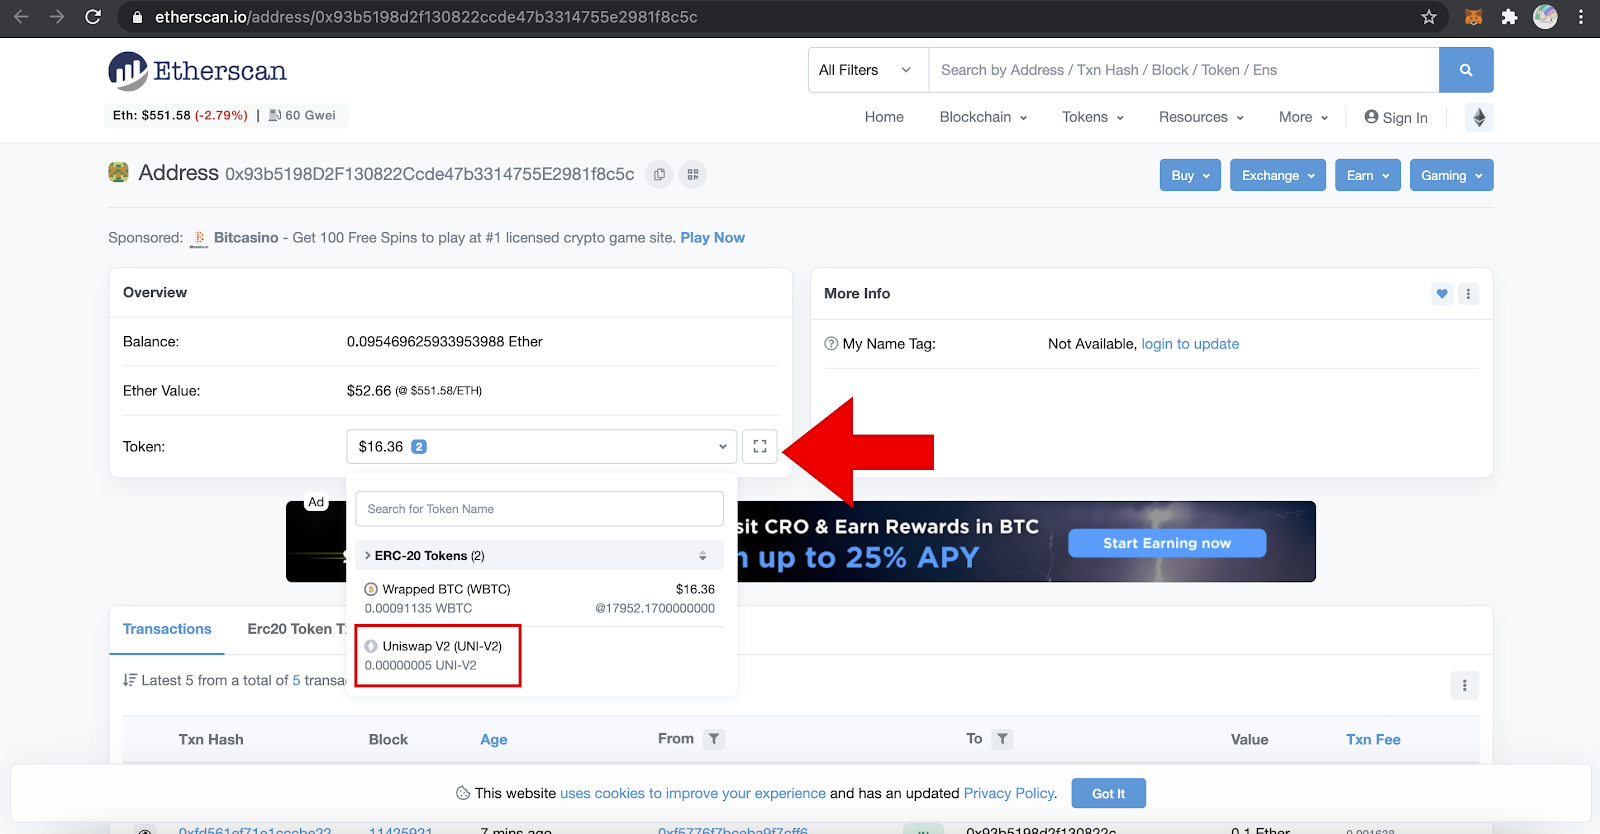
On Etherscan, you can check a detailed overview of your Ethereum address. To see the LP tokens, check the section ‘Overview’ on the right and click on the ‘Token’ dropdown menu.
In the dropdown menu, you will see all the ERC-20 tokens your address holds. The LP token is called UNI-V2. Click on it.
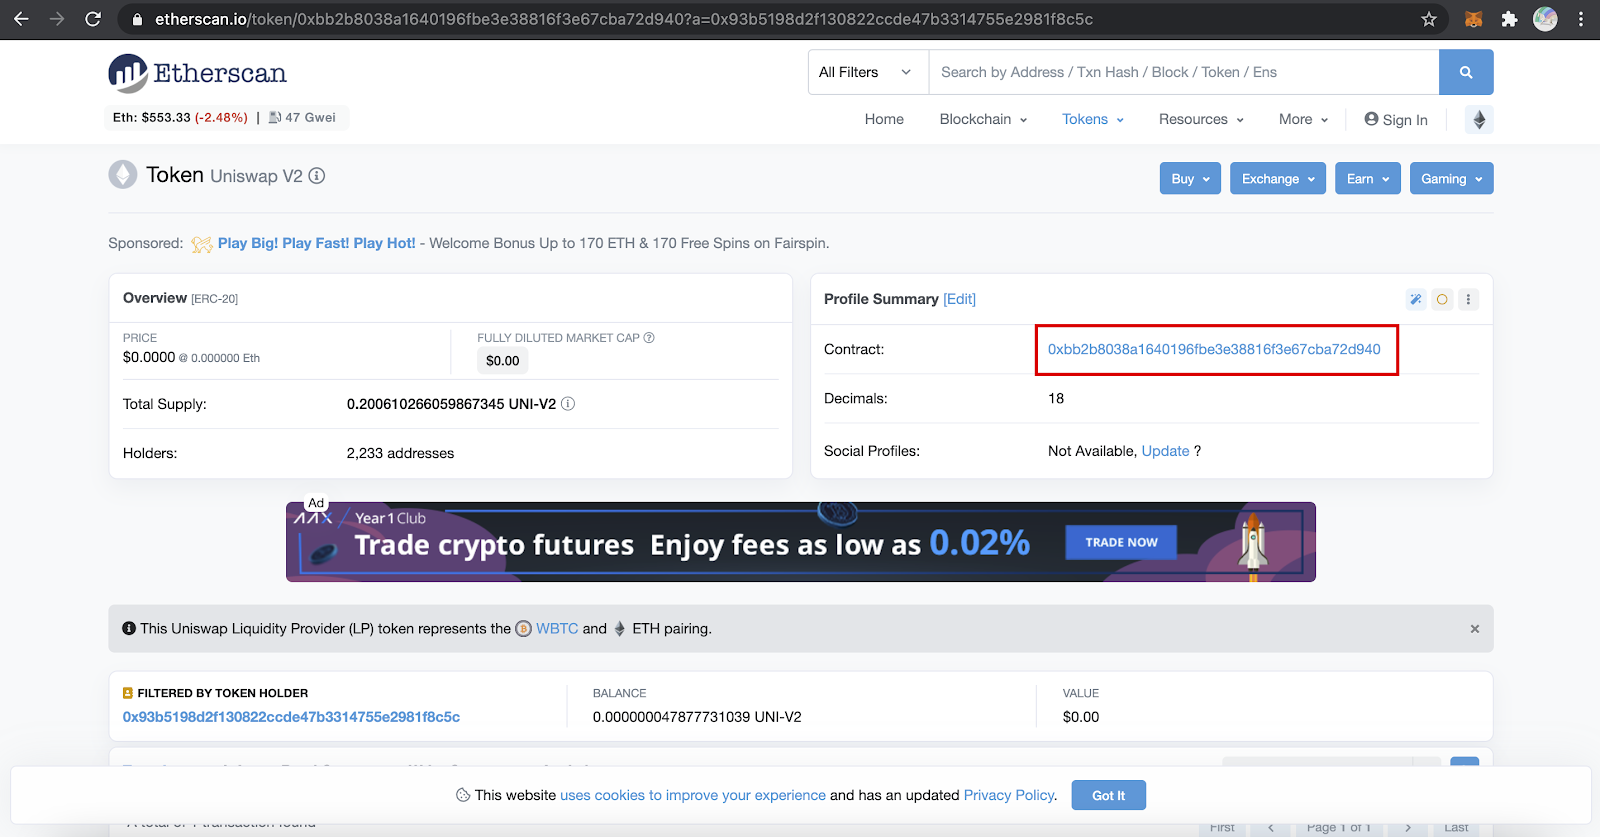
Etherscan will take you to the Uniswap V2 token’s address. You need the ‘Profile Summary’ section on the left. Copy the string of characters in the ‘Contract’ section.
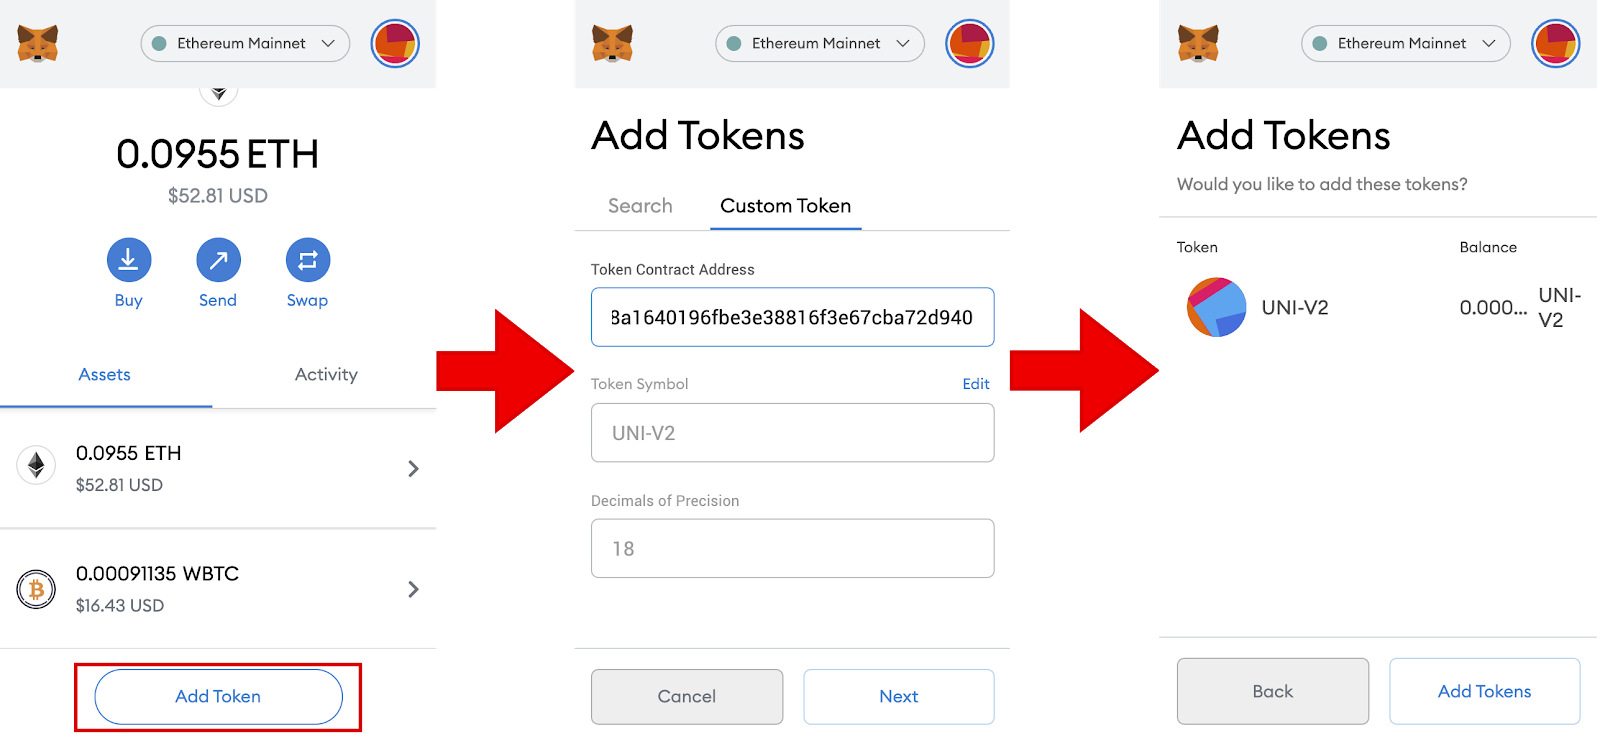
Get back to your Metamask and scroll all the way down. You will see the ‘Add Token’ option. Click on it, and on the next page, click on ‘Custom Token.’
On the ‘Custom Token’ page in your Metamask, place the cursor in the ‘Token Contract Address’ field and paste the UNI-V2 address you copied earlier. Metamask will fill out the remaining fields automatically. Click on ‘Next’ and then ‘Add Tokens.’
Now you see your LP tokens in your Metamask. Click on ‘Account,’ and you will see that the tokens are added to the list.
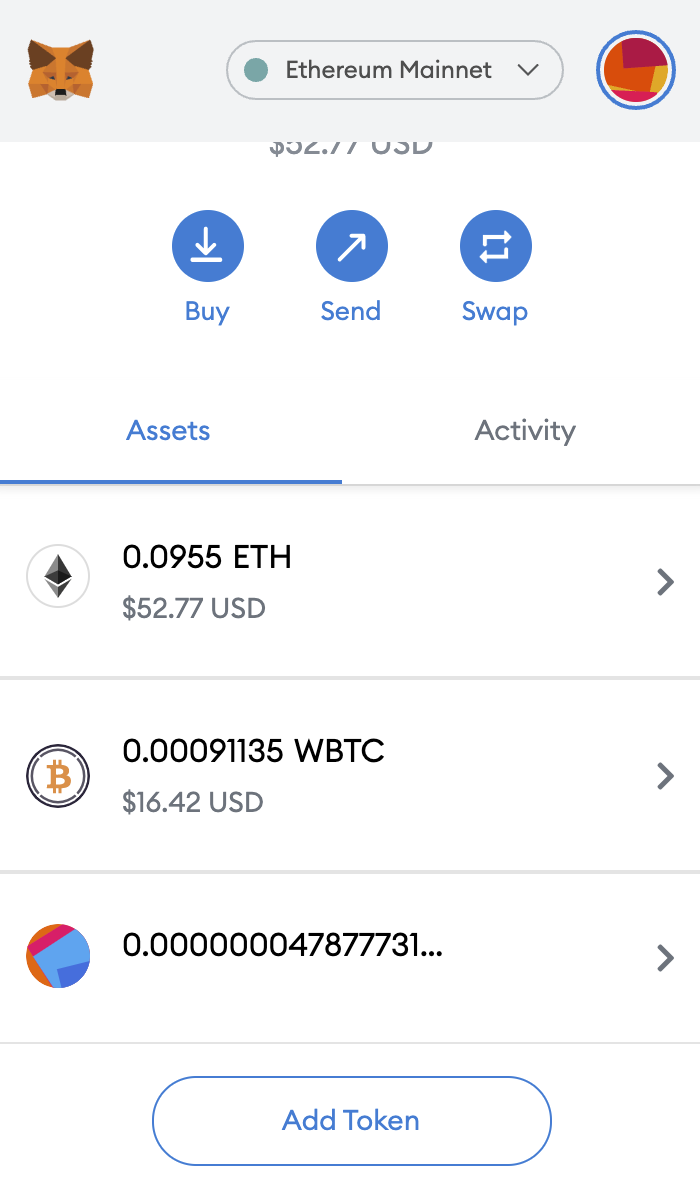
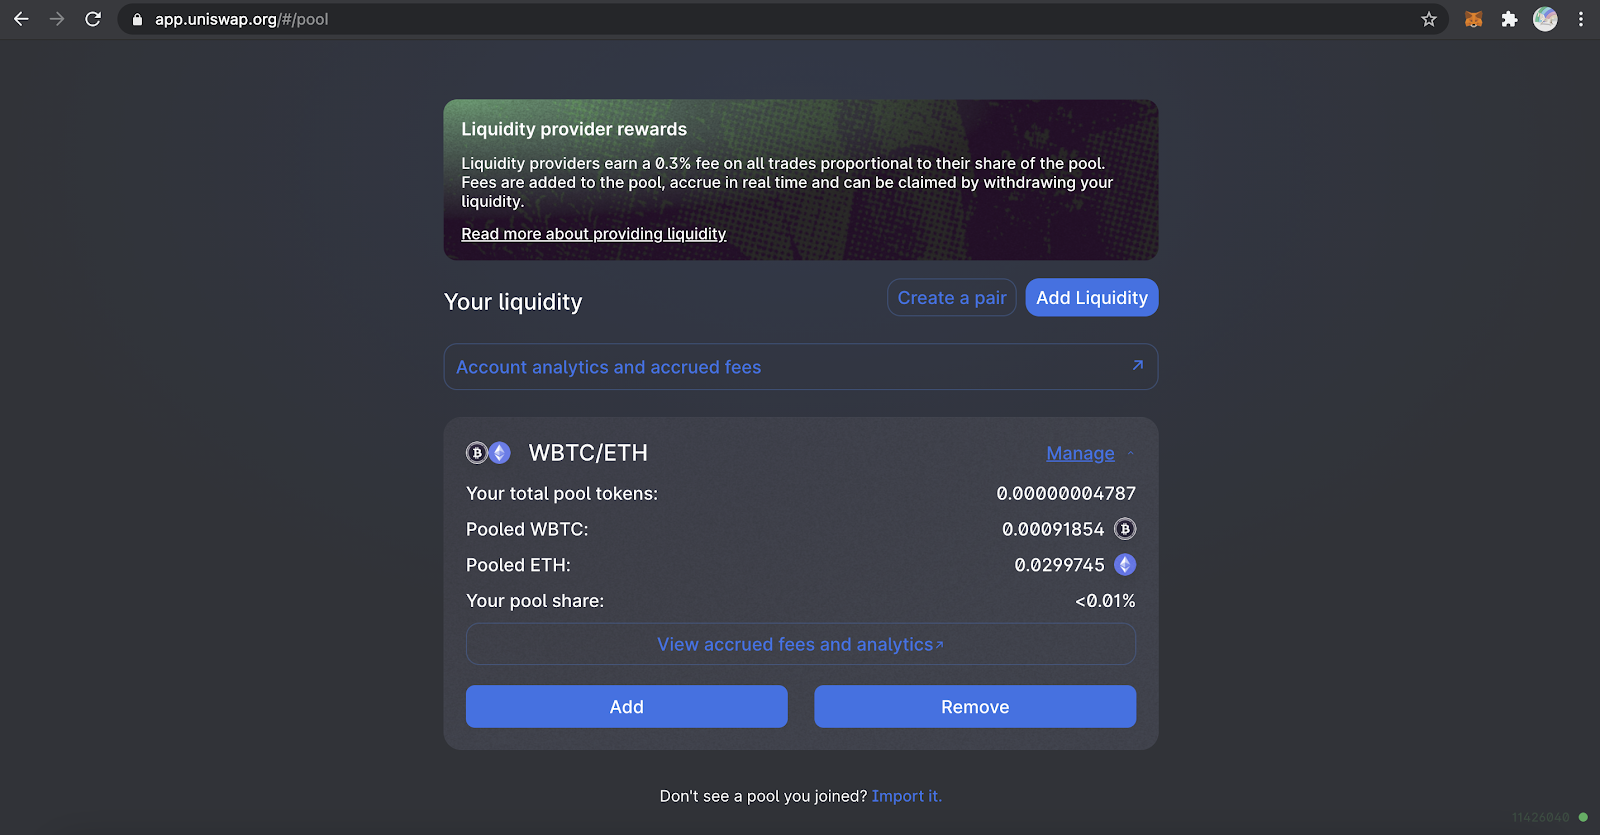
Another way to verify your share in the pool is to go to the ‘Pool’ tab in Uniswap. If you have LP tokes for a pool and your Metamask is connected, Uniswap will automatically detect your ownership.
To view details about how much of each of the assets you provided to a pair and number of LP tokens, click on ‘Manage.’ You can also modify your percentage of the pool’s ownership by using ‘Add’ or ‘Remove’ buttons.
When you decide to stop providing liquidity, click on the ‘Remove’ button in the pool section and set the amount of liquidity to 100%.
If you never did this before, you will need to approve the operation first. You won’t pay any fees for this, just click on ‘Sign.’

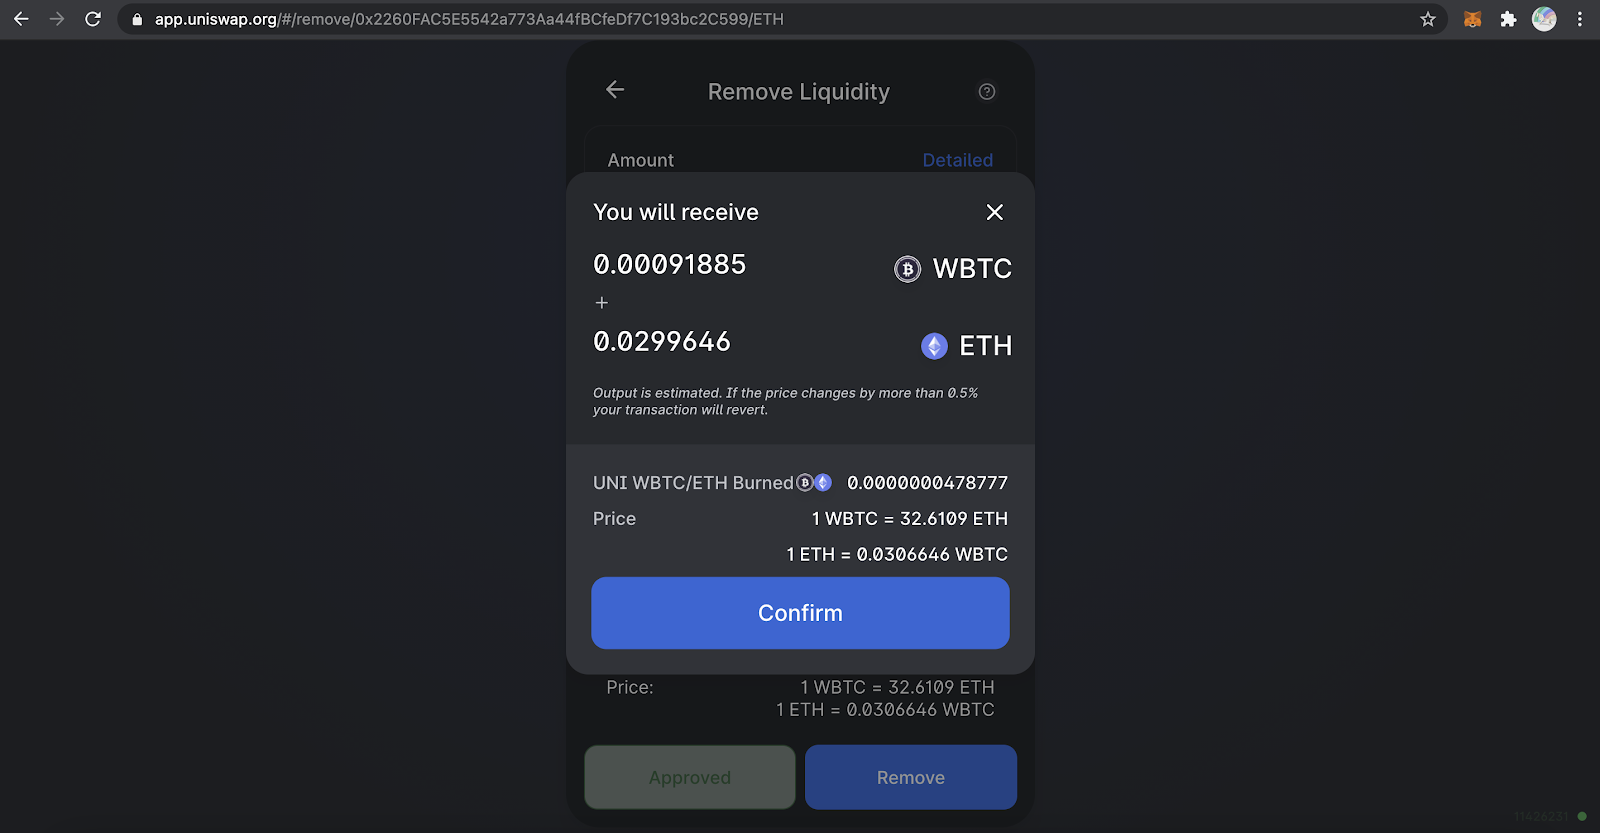
When you remove your liquidity, Uniswap will withdraw your LP tokens and send back ETH and WBTC depending on their ratio in the pool along with the accrued fees.
The amounts of ETH and WBTC, you will get will most likely differ from what you supplied to the platform, which is caused by constant changes between x and y.
Uniswap will let you review how many of each of the tokens you will get. So, you may try and wait for some time if the ratio you got turned out to be unfavorable.
In the case of ETH / WBTC the fluctuations are mild due to the pair’s high liquidity. Click on ‘Confirm’ to proceed with withdrawal and approve the transaction in the pop-up window.
Once the transaction goes through, you will receive ETH, WBTC, and the percentage of fees that your liquidity accrued throughout the period when you provided liquidity.
And there you have it. With this comprehensive instruction, you can make more with your assets. Some pairs, such as ETH / 1INCH at the moment, can provide you with hundreds of annualized percentage returns. However, such returns aren’t sustainable, and the pools are risky.
In one of the next newsletters, I will review how to calculate ROI and risks for different pools and platforms. It’s essential to do your research before putting tokens in a pool, as things like high impermanent loss and rug pulls can lead to large losses.
